| Just like the Dell Mini 1012, upgrading the memory is not a simple task on the 1018. One needs to remove the keyboard, hard drive, and entire top half (palm rest) in order to get access to the memory (and other modules such as bluetooth, wifi, wwan, etc). It’s not particularly difficult if you have the right mini screw drivers and plastic card (to pry stuff off), it’s just a bit time consuming. Continue on to learn how! |
Tools required:
All you need are some mini screw drivers and a plastic scribe (I used a credit card) for prying parts of the case apart.
| For those interested, here’s the set of screw drivers I used in the video (they’re quite cheap!): | Or, for a few bucks more, you can get a set of Boxer mini screw drivers with a bunch more precision bits (including torx): |
Note: While following either the video or picture guide, it’s a good idea to also follow the Dell Service Manual (it’s what I followed to make these guides!)
How-to video:
As with the 1012, here is a video guide to dismantling the 1018. For just upgrading the memory, it’s similar to the 1012 except there is no memory access door under the keyboard; you have to go one step further and remove the palm rest as well.
and of course, re-assembling it:
Picture guide:
And for those of you who want a picture guide, here you go (unfortunately, I forgot to take actual pictures when taking the video, so all the images below are video screen grabs, so the quality isn’t perfect):
1) Press out the two tabs holding the battery in, remove it, and unscrew the three screws holding the keyboard in:
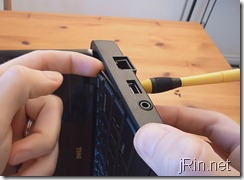
2) Flip the laptop on it’s side and stick a screw driver in one of the keyboard holes to push the keyboard out a bit. This will allow you to pry out the keyboard:
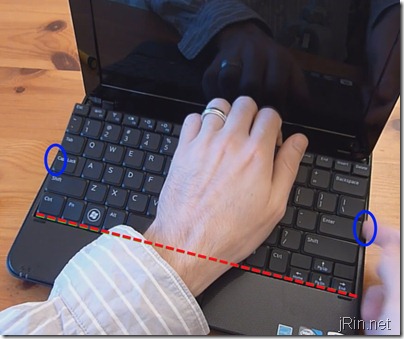
With your finger under the keyboard, use the rest of your hand to grab the keyboard, rotate it towards the palm rest as though there was a hinge at the bottom while breaking free of the two clips on the left and right. Pull it toward the screen about half an inch, and flip it upside down on the palm rest (note that it is attached to the motherboard via a ribbon cable, so don’t pull it too far away from the laptop yet).
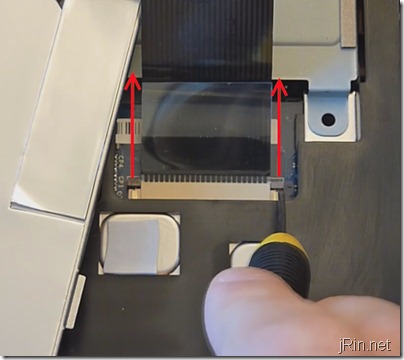
Now you just need to push out the two grey tabs securing the keyboard cable to the motherboard and then remove the keyboard:
3) Remove the single screw holding the hard drive in, pull it to the left using the pull tab, and lift it out. (If you want to replace the hard drive, remove the 2 screws on either side and replace it). 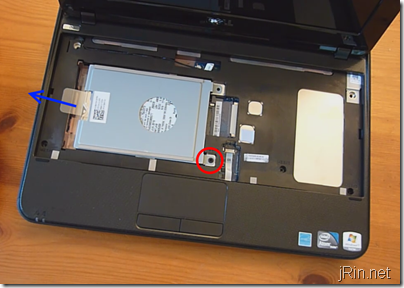
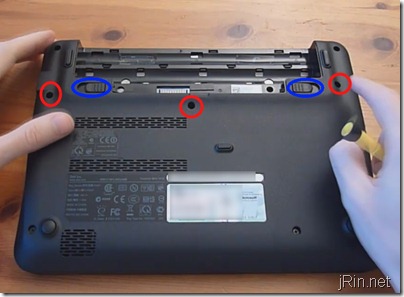
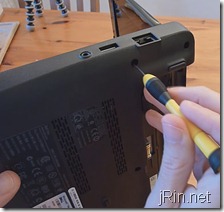
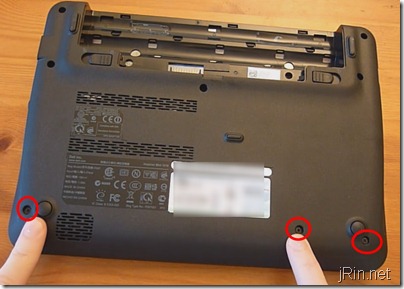
4) Prepare the palm rest for removal. Start by flipping the laptop over and remove the 3 bottom screws holding it down:
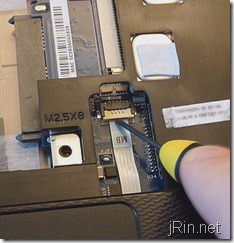
Then, flip it back over, open the screen, and remove the touchpad cable by flipping up the latch securing it to the mother board and pull the cable out:
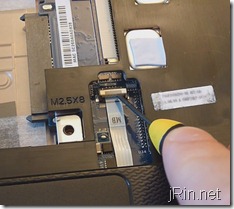
Next, unplug the power button cable by simply pulling it out. If you can, grab the actual plastic piece of the connector, but if not, you should be fine just pulling on the wires or the sticker tab: 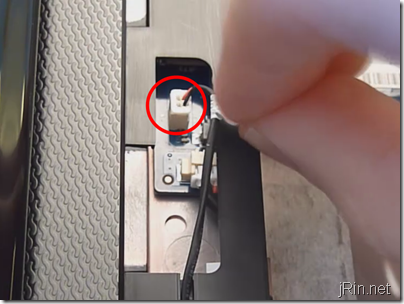
Last thing to do is to remove the top 3 final screws holding down the palm rest: 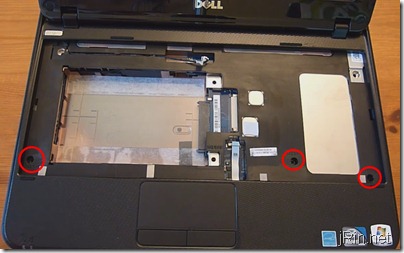
5) Pry off the palm rest. Start out by using your finger to pry it apart starting on the left, inner part (I’ve found it to be the easiest place to start). Once you get one of the clips loose here, you can use a credit card to break free of the clips all around the left, bottom, and right side: 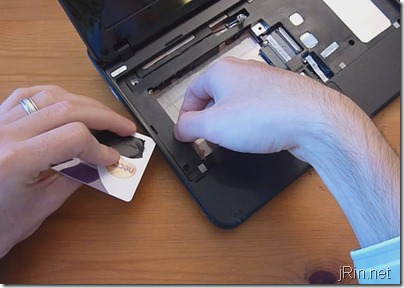
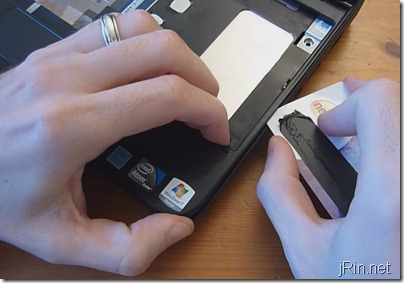
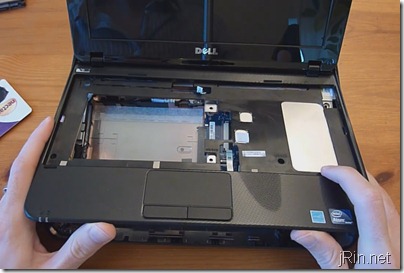
With the left, bottom, and right loose, you basically just lift it up from the bottom until it breaks free from the screen hinge area. It may seem like it’s going to snap in half, but as long as you removed all the screws and such, you should be fine!
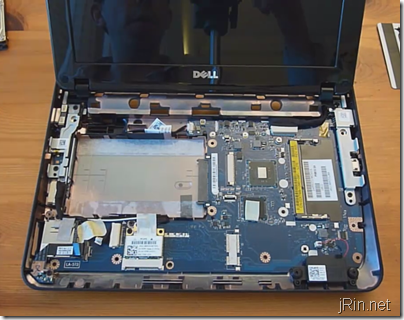
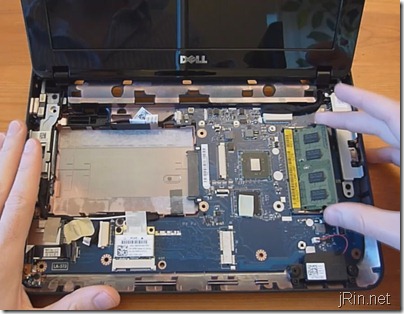
6) Upgrade the memory. You now have access to the memory slot – if you want to upgrade it (max 2gb ddr3 stick), simple push out the two tabs and the stick will pop up – pull it out and put in your new stick and you’re good to go! (note, this takes DDR3 memory and not DDR2 like all the previous Dell Mini 10v’s)
If you are looking for some DDR3 memory, here are a few cheap options from Amazon.com that would work:
7) Disconnect the display and Wi-Fi cables in order to remove the screen. Start by using a screw driver or your finger nails and push the edges of the display cable towards the display until the cable is unplugged: 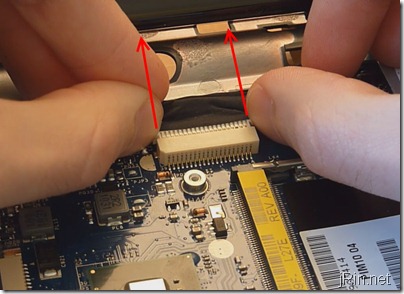
Next, remove the white (left) and black (right) wifi cables by simply pulling them off, and then un-route the cable all the way to the display hinge: 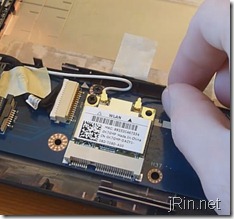
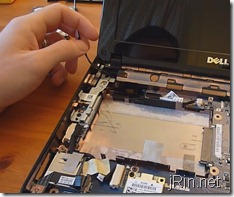
8) Remove the middle cover and the back display screw. Start out by flipping the laptop over and remove the two screws securing the middle cover: 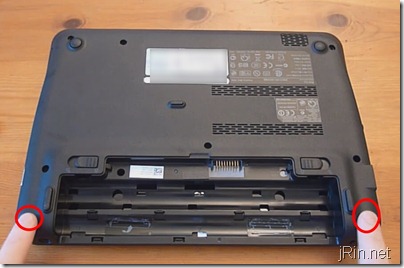
Then, using a plastic scribe (or, if you don’t have something similar, use a screw driver – but it may rip up the chassis a bit) and pry up the middle cover just enough to slide your credit card (or similar) in to release all the clips and pull off the cover. 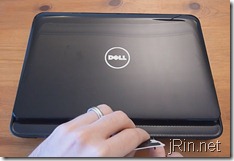
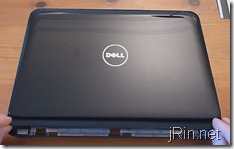
With the cover removed, remove the single rear display screw: 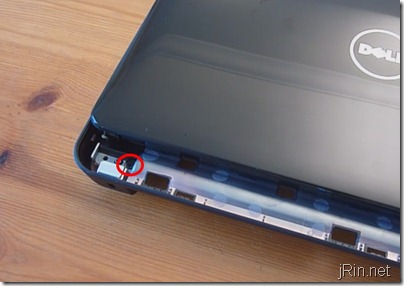
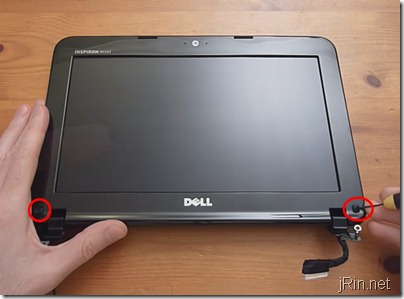
9) Remove the display assembly. There are two final screws holding the display to the chassis. While removing these screws, be sure to hold onto the screen so it doesn’t pop out in the process of removing said screws: 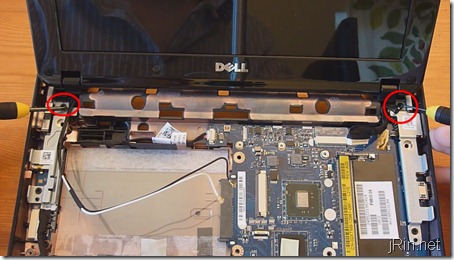
10) Remove the display bezel. Pry off the two sticky, rubber screw covers and then remove the screws underneath:
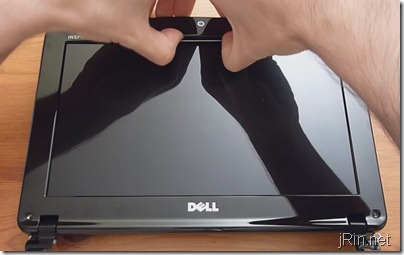
Now, start to pry off the top part of the bezel by prying from the inside while being careful not to put too much pressure on the screen itself. There isn’t much to explain about how to do this other than basically try to rip it off, haha – with any luck, you won’t break any of the clips and everything will be fine:
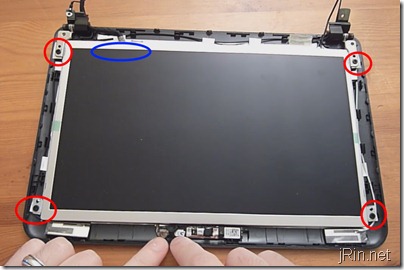
From here, remove the four screws securing the screen to the bottom bezel. With them removed, start to pull the the display away – there may be some sticky tape on the underside, so be aware when removing:
Before you completely pull the screen away from the bottom bezel, you’ll need to pull free the webcam cable. Just simply grab it from the wire and gently pull it free: 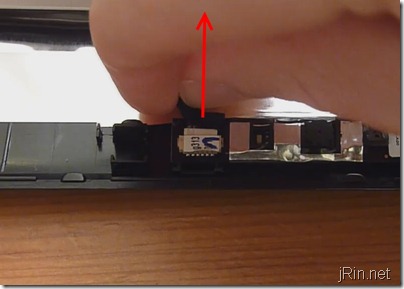
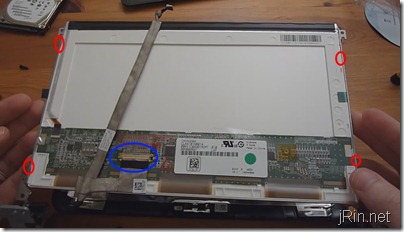
12) If you want to keep going, you can remove the 2 screws (4 total) on either side of the screen for the brackets, and simply pull off the ribbon cable on the back, in order to free the actual display from everything.
To put it back together now, simply follow this guide in reverse!
That’s it! Let us know how your dismantling, upgrading, and/or reassembling goes in the comments!

Pingback: Upgading to 2GB RAM... - Page 2
When removing the LCD- did you happen to notice if the inverter is mounted on the lcd itself, or is it easily removable and transfered to a replacement LCD?? My LCD has a slightly annoying red hue, so whites look warmer than ideal. If it annoys me enough I may order a new screen but last time I replaced a LCD in a laptop the inverter was a royal pain in the butt. Could you shoot me an email and let me know if the inverter is easily transfered or taken off the original LCD? Thanks!
@Matt, sorry, but I don’t remember checking if the inverter is mounted that way and I no longer have it to check for you… if anything, it may be worth asking dell to just replace the entire netbook (if you ordered within 14-30 days, forgot which it is that they will replace the entire device) or even just send a whole screen assembly replacement (if so, you wouldn’t have to worry about the inverter!)
Many thanks, I definitely don’t get on with SFF devices so the guide was very handy.
James
Thank you very much for the time and effort. It sure helps us DIYselfers from breaking things!
Do you know if it is possible to upgrade the LCD screen from WSVGA to WXGA? Both are available. Don’t know if the connector is the same, pin out the same or if Intel GPU would handle it. Any thoughts?
Thanks again.
Great guides and awesome post, James.
I’m on the cusp of buying either a 1018 or a HP 110-3101 at the moment.
I looked at the Dell because of HPs aggressive ‘Whitelist’ for miniPCIe peripherals. Does the 1018 suffer from this issue too?
This would be a great card to stick in either and I’d rather avoid BIOS hacking…
Once soldered on does anyone know if the 2nd MiniPCIe connector is fully functional?
Sorry for hijacking your blog comments, James.
@Brydo, you know, I’m not sure – I haven’t heard of there being issues with adding misc minipcie cards, but that doesn’t mean that there aren’t haha – sorry I couldn’t be of more help!
BTW, I found this card on my web travels. This would be a great addition.
http://www.oxfordtec.com/uk/p277/SparkLAN-WPER-101GN%28BT%29-Combo-WiFi-&-Bluetooth-module,-802.11n,-b/g/N,-1T/1R-Mini-PCI-Express-Half-Size-Module,-Ralink-RT3090BC4-SoC-Solution/product_info.html
I’ve run into a major issue! I’m wondering if anyone can help me. While pulling out the palm rest, I forgot to first disconnect the trackpad connector. The trackpad connector from the palm rest end came out, and I tried many times to put it back in and taping it there.. but it hasn’t worked. Since then, I haven’t been able to get the trackpad to work anymore. Does anyone know how it is supposed to be connected there? Any help would be greatly appreciated. Thanks.
best buy wouldn’t touch it for me. F’em I did it myself. Thanks it worked perfectly.. You rock.
are the places where the screws attach the hard drive to the netbook clips that are part of the hard drive? or is it just a couple of metal clips attached to a regular sata hard drive? i want to upgrade to a SSD but want to make sure any regular sata SSD will work. TYIA
i try to upgrade bios in a dell mini 1018 ….. and when restart all stop what i can do …. i thing to zero bios batery and it restart ….but how i can do it becouse the batery is not infront ….
Pingback: HD Display in Mini 1018
Hello, my netbook didn’t come with Bluetooth, can I added this feature into my netbook? and if so what other things can I add to it? thanks
@Dan, sorry for the late response, but yes, they’re actual places where the screws attach. In other words, you’d be able to replace the HDD with a SSD.
@Jim, sorry, but don’t quite understand what you are asking. If you’re asking how to replace the bios battery, looks like you’ll need to further dismantle the laptop to get to the underside of the motherboard, and unfortunately I don’t have my 1018 anymore to give any advice
@Martin, I’m not sure – mine, for example, didn’t come with any of the card headers to be able to add it after the fact. In other words, mine didn’t come w/a bluetooth card and therefore it also didn’t come with a slot to actually install one. However, I have seen others where they’ve also not ordered it but *did* have the slot.
Good teardown! Thank you!
I am looking at possibly getting a 1018 and replacing the realtek wifi with an intel 6200 so that it’s actually usable in linux. Your screen grabs helped me see what would be involved. Much appreciated.
This was awesome. It helped me do a memory upgrade in less than ten minutes. Great job!
mr. james i have mini dell inspiron 1018 that already have 2gb ram,my question is,can i upgrade to 4 gb or 3 gb,coz is still run slow,many thanks
Awesome Illustration..!! I love this but I still can’t locate where the CMOS Battery is.. I want to remove it.. Mine needs replacement.. but I can’t find it on the motherboard..
Any help will be highly appreciated.. Many thanks in advance..!!
hi
My Dell inspiron mini 1018 laptop start up as per nomal and then after 30second is just stopped working and then the power button will not work for 15 mins and after the again the same process goin on ..plz help to fix this problem
adata ddr3 1333 premier 2gb works perfectly
Hi, the back cover of my lcd screen cracked (dropped). Can I replace it without voiding my warranty? The laptop is two weeks old!
@degert, yes, you should be able to, as there aren’t any stickers or seals that must be broken in order to replace it (thus alerting Dell that you’ve dismantled it) – however, you may be hard pressed to find just a replacement lid, meaning, you may need to purchase a whole new display assembly to get a lid (a quick search on ebay didn’t pull up anything, but perhaps dell offers them direct?)
@James, thank you, I will let you know if I’m successful!
And I thought this was going to be easy ! Hah ! Dell got me on this. I should have just had the 2GB stick put in when I ordered it. This is not a task for the faint of heart like me. I’ll pay a tekkie at work who has the right tools and know how to do it! But it’s a great step by step guide. Thanks so much.
Hi James,
Memory upgrade worked perfectly. Thanks for this, you just made my life a whole lot easier.
is there any way to correct worn out touch pad buttons on 1018. mine has its right click button press hard to get it work
I found this on Ebay:
http://www.ebay.com/itm/Dell-Inspiron-MINI-1018-Touchpad-Palmrest-FKYKK-/160652982796?pt=LH_DefaultDomain_0&hash=item2567a9fa0c
All you would have to do is follow the instructions for disassembly and swap out palm rests. Should be fairly easy. Just flip up the black plastic piece that connects the track pad to the mobo. Also make sure the ribbon cable is inserted all the way. There is a black line on the ribbon cable that should line up with the white plastic connector.
Here is another one that is only $12
http://www.ebay.com/itm/Genuine-Dell-Inspiron-Mini-1018-Palmrest-w-touchpad-Mouse-Buttons-FKYKK-0FKYKK-/290674490120?pt=LH_DefaultDomain_0&hash=item43ad8cbb08
Thanks for this howto. I bought a stick of 2GB DDR3 SODIMM at a local department store… Didn’t work. I took a stick out of my laptop and it booted fine. The only problem I had was removing the palm rest, I forgot to disconnect the track pad from the mobo. The black plastic clip shot off of the mobo. A pair of tweasers and mad skills playing “Operation” fixed the problem. Upgrading the ram really helped. I am running Ubuntu 10.04 with vmware — virtualizing WinXP. No more lag now. The next upgrade will have to be putting in a SSD! Whoot whoot!
This is a great little platform… I only wish that it had a better wifi card. External Alfa works good with the Linux though.
Thanks.
great video instructions. used it to upgrade memory to the 2GB max, upgraded the HD to 500 GB, and swapped the wi-fi card with an Intel Centrino wi-fi/WiMAX card. I now have a souped up 10.1 inch netbook/laptop registered with Clear WiMAX, so I have high-speed automatic internet access anywhere I get a cell signal. I hate touchpads, so I use a micro-sized USB optical mouse. I dual-boot Win7 and Solaris10-x86, and run VirtualBox for testing fun. This is an EXCELLENT package for remote IT support work!
I took apart my laptop after it got wet, left it out to dry for three days, and put it back together. Now only the power light turns on, and the computer makes beeping noises… HELP!!!
thx… and the instructions were great…
The laptop making beeping noises is indicative of some sort of hardware failure. The pattern of beeps is very important as it indicates which piece has failed. Please reply back with the series of beeps. Dell also has a good list online somewhere.
I would like to replace the hard drive in my Mini 1018 with an SSD. Is the BIOS on the motherboard or on the hard drive?
I thought I had read that that putting the BIOS on the hard drive was a common practice.
Thannks
James, you may know by now that you’re a legend! Thanks so much for your clear instructions, it was like having a true expert watching over my shoulders. When I was half way it would have scared me to realise how easy I could make a mess but all your comments and information were so true and gave me so much confidence. God bless you!
i tried to open my dell mini 1810 today for fixing the 8 beep problem.. i cleaned the ram, replug the lcd cable but it still beeps.. can someone help me please. thanks in advance
I used the Crucial 2GB Single DDR3 1066 MT/s (PC3-8500) CL7 SODIMM 204-Pin Notebook Memory Module CT25664BC1067 mentioned here to upgrade my RAM, and now when I try to boot up, the screen stays black and I get two beeps. Thoughts? Did I just not get the RAM settled in properly?
Otherwise, excellent instructions.
Never mind, it was the RAM not settled in properly. Thanks for the awesome instructions!
Hello!
My 1018 starts and two joints sound, no picture or anything. I removed the memory and cleaned as described in this excellent video …. but nothing
Ayuda por favor
Hi James, thanks for the clear instructions on how to get into the 1018. I have two basic questions that I hope you might have time to help with (since am new to this):
1. When replacing the hard drive (with e.g. a Samsung Evo SSD), is it the norm to put it in the ‘caddy’ that came with the laptop, or is it fine to just ‘slot’ it into place, like another video seems to show?
2. I have successfully remove two of the three screws in an attempt to reach the memory module and remove the palmrest. But the grooves of the third screw (far left) were already slightly worn down when I opened it up (surprising as this was bought directly from Dell several years ago) and it is really stuck (one of the 2.5Mx5 ones). Any tips from your dismantling expertise as to how to loosen this tight screw please?
Many thanks in advance.
Hi Flick – as far as the caddy, it depends on the laptop. Some have them, some don’t. If there’s no caddy to begin with, then you don’t use one. The only thing to note is that some SSDs are 7mm height, while others are 9mm. If the laptop you have does not use a caddy and originally took a 9mm HDD (or SSD), you may need a spacer/riser to properly fit a 7mm SSD (some SSD/HDDs come with the spacer, some don’t).
For the tight screw, hmmmm – when that’s happened to me before, I’ve tried using a flat head screw driver as that would sometime get a better grip (especially if just one or two of the ‘slots’ in the philips groove were worn) — other than that, my only suggestion is search google for similar issues and see what others have done! best of luck!