Just purchase a Dell Mini 1012 with the new Atom N450 chip? Want to upgrade the memory, hard drive, or pci-e cards but realized that Dell did not provide a service manual to assist in dismantling it (like they have for most other computers they sell)? Luckily, it’s as simple as removing 4 screws and the keyboard to replace the memory, and then 5 additional screws and prying off the palm rest bracket to get to the pci-e slots!
(note — should you decide to follow this guide, do so at your own risk – I take no responsibility for anything you may damage in the process :))
HD Video Guide:
Don’t want to watch the video guide? Continue on with the step by step picture guide below!
Remove the keyboard
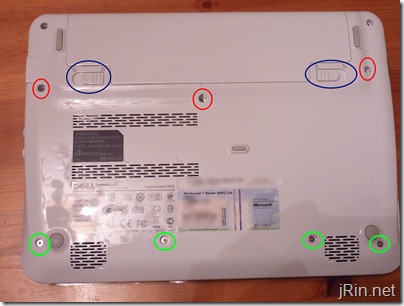
The first step is to remove the keyboard. It is held in by (3) screws on the underside of the laptop, as well as it’s data cable. Start out by flipping over the netbook and removing the battery by pressing the clips left and right [blue] to unlock it (then, remove it). Next, remove the (3) keyboard screws [red] – the one in the middle may not easily come out, but you need not worry about it as it will fall out once you actually remove the keyboard.
— while you’re at it, go ahead and remove the (4) bottom screws as well (green) – these hold on the palm rest and you’ll need to take them out eventually anyway —
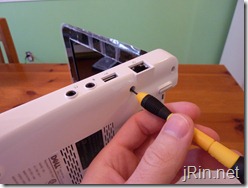
With the screws removed, flip it back over and open the screen to like a 90 degree angle and rest the laptop on it’s side. Take a small screw driver (or anything similar) and stick it through one of the left or right (depending what side the laptop is resting on) screw holes. This will push the keyboard out a bit so you can grab a hold of it on the other side in order to pull it out. Don’t pull the keyboard too far away because it is connected to the motherboard by a cable.
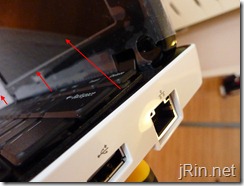
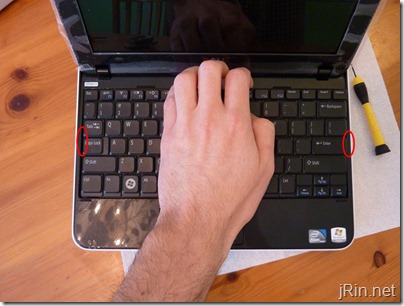
With the keyboard a bit loose, make sure it is free from the two clips on the left and right (red circles), and then flip it back over onto the palm rest (so the keyboard keys are resting on the palm rest / touch pad), again, remember that it is still attached to the motherboard via the data cable.
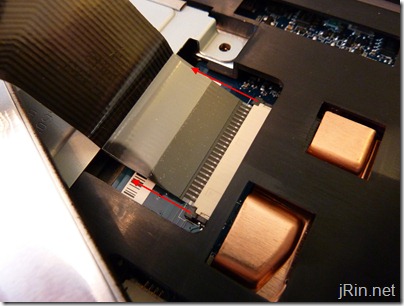
Now, we’ll remove the data cable – just simply push these two tabs out a bit (1mm or so?) to release the data cable and remove the keyboard entirely.
Remove touchpad and power button cable
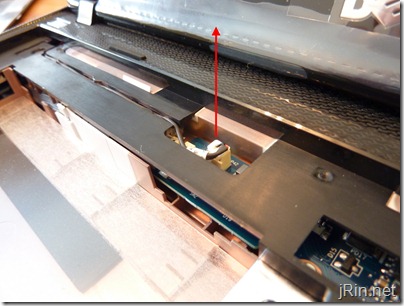
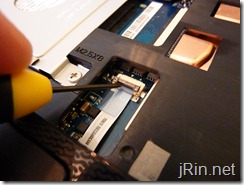
Simply pull out the power button cable from the motherboard (just pull up on the cable) – it is a little snug, so it will take a little bit of force,
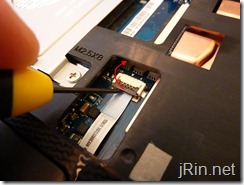
Then, pull/push up the latch holding down the touch pad data cable, and then pull it out:
Remove the memory, hard drive, and remaining palm rest/bezel screws
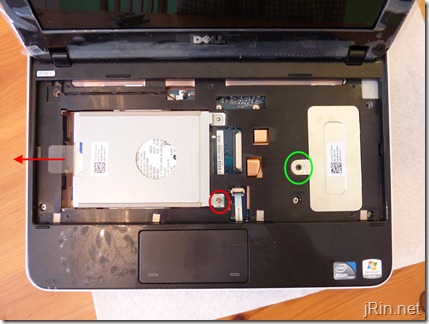
Remove the (1) screw holding in the hard drive [red] and slide the drive to the left and pull it straight up and out as well as the (1) screw holding on the memory access door [green]:
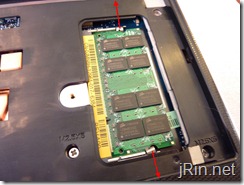
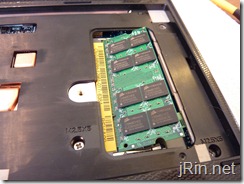
Remove the memory (and later replace this 1GB stick with a 2GB stick!) by pushing the (2) clips away from the stick (and the stick should then pop up).
Remove the palm rest bracket/bezel
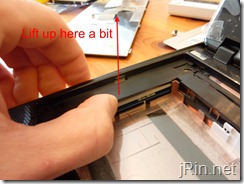
You will probably hear a lot of snapping and cracking during this process, but it will be okay! Start out by getting a credit card, lift up on the middle left part of the bezel (from the “insideâ€) and stick the credit card in the left side:
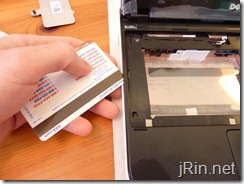
Continue to slide the card all around the palm rest with just the tip of the edge/corner of the card – this is when you’ll probably hear some snaps, crackles, and pops. It’s just the palm rest being released from the clips.
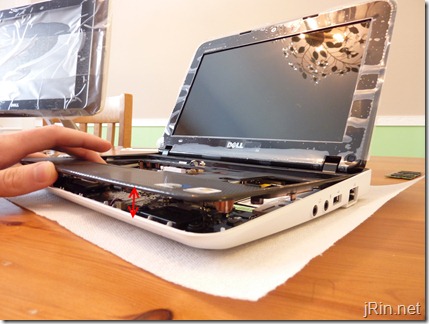
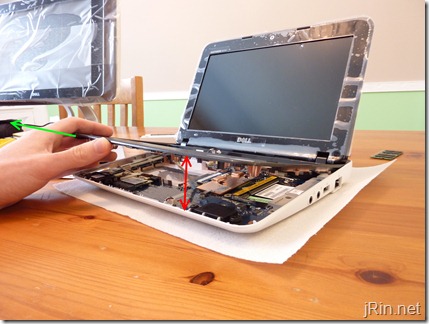
At this point, the palm rest should be fairly loose and you should be able to lift it up (from the front) only about an inch or so, as it is still attached near the screen:
Now, all you need to do is simply raise it up a bit more until you near it snap/crack, which should just be it being release from the clips at the screen, and then pull it free:
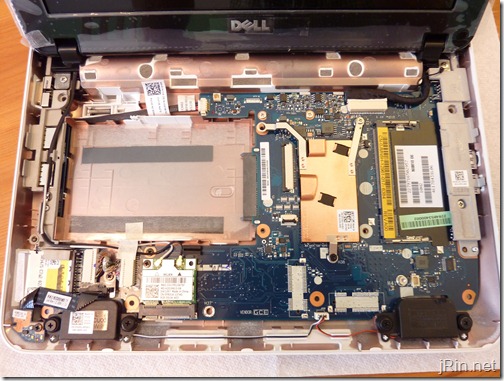
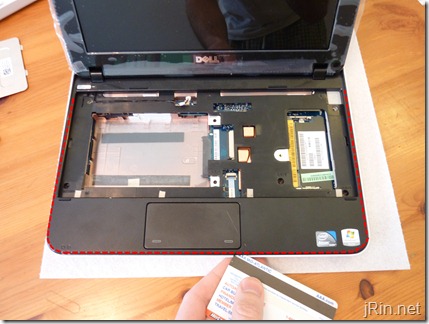
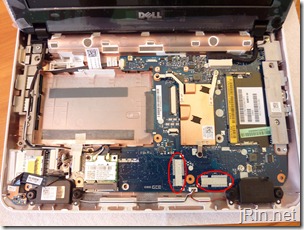
Congratulations, you now have access to the motherboard where you can replace/remove the mini pci-e cards / etc! To put it back together, basically do everything in the reverse order.
Unfortunately, I did not order mine with Bluetooth, TV tuner, hd decoder, etc so I am unable to show you what those look like – but as you can see, there are locations on the mother board for those headers (keep in mind, it appears that if you don’t order the netbook with bluetooth or the mini pci-e cards, the headers will NOT come on the motherboard, meaning, you cannot easily upgrade in the future):
for those of you looking for cheap 2gb memory sticks, all of the below options will work:
Sounds off in the comments about how dismantling and upgrading goes for you or if there are obstacles not mentioned here due to other pci-e cards being present — Good luck!

Thank you! Your guide helped a lot!!
Upgraded with memory from Amazon – Crucial Technology CT25664AC800. Thanks again for video and instructions. Made the installation easy.
Thank you so much! I needed to upgrade my daughter’s memory for her netbook and the directions Dell sent were completely wrong telling us to unscrew doors which didn’t exist. Thank you thank you thank you!
Used these instructions to upgrade the memory on my wife’s 1012 to 2 Gb. For memory replacement, it’s totally unnecessary to remove the ribbon cable from the connector so if that’s all you’re going after just place the keyboard out of your way while you remove the cover.
Also, remember to put the memory cover back on. I had it all put together before I realized I forgot that.
So far it appears the upgrade was worth the $25. Now to eBay the module I took out.
great instructions – as mentioned don’t remove the keyboard connector if you are only upgrading the RAM just carefully flip it over after prying loose from the clip. I used a large paper clip to flip out the keyboard and to pop out the old memory stick. Windows 7 recognized the new memory. Paid $40 for 2GB Crucial memory stick (came very fast even with the free shipping option).
thank you, I bought a 2gb memory ram and I wasn`t know how put disarm my laptop and put the memory
thank you again
Fantastic article
Really clear and easy to follow.
have just upgraded the memory in a 1012 in ca 20 min start to finish. Could not have done so without thhis help
THANKS !!!!!
Can 1012 support bigger RAM?
maybe 4gb?
Cz I want to upgrade the bigger RAm.
Thankss
@Timothy, nope, 2GB is the max the chipset will recognize
umm..
Ok, thanks for your info..
Btw, what is the type of your dell?
:p
@Timothy, type?
the model I mean
Great instructional video/documentation James !
Kudos for your easy to understand guide. My skills are with desktops, and I was more than a little apprehensive taking my new Dell-Mini apart.
I was able to follow your video at my own pace, and feel comfortable with your instruction.
Thanks so much for assisting me with your exceptional video !
Sorry how replace the led panel???
Pingback: Couple of hardware questions
Thanks for the tutorial! I don’t think I would have attempted it without your help.
Alas, the Corsair VS2GSDS667D2 667MHz Sodimm memory that I put in didn’t work – even after reading on the Corsair site that it would (http://forum.corsair.com/forums/showthread.php?p=451921).
Does anyone know of a memory module that works with the Dell mini 1012?
Update – I used Crucial Technology CT25664AC667 for the RAM upgrade, and it works just fine. I wondered if upgrading the Dell Mini 1012 from 1GB to 2GB would make much difference. Yes it does. With 1GB, surfing the net was slow – slower than I expected – but I thought that maybe that’s as fast as netbooks get – I never used one before. I lived with it for half a year and very happy now that it performs pretty much like a regular laptop now with the 2GB chip in it.
Nice!!! you are the best!!!!
Thanks.
My 1012 is rebirth.
Thanks over and over! I had no Idea how to get into this netbook and had already bought the RAM thinking it would be easy. Short of a hacksaw, i would not have been able to do it if I had not seen your tutorial. Took about 15 minutes to do start to finish! Great work and thanks for helping us!
thanks so much !! just did mine in about 15 minutes – previous posters are correct – don’t need to remove the cable and palmrest if you are just upgrading the memory – rebooting now and we’ll see how much difference it makes – again – many thanks !!
I ordered the Kingston KVR800D2SO/2GETR 2GB memory. I got four continuous beeps from the Dell 1012. I took the battery out replace the 1gb memory and now the computer will not boot?
Thank You very much – it was my first time with dismantling a netbook andI did it in no time!
You’re a great scholar :-)
Thank you! I wanted to upgrade the memory :).
~Erin
THANK YOU…
BOUGHT MEMORY VIA THIS WEBSITE FROM BEACH CAMERA
Great video on the Dell mini 1012. I was wondering if you could tell me where I can buy or recommend replacement rubber feet for my Dell Mini 1012? Greatly appreciated.
Thank you very much…went quite well…I’ll be sure to use your affiliate/associate link in order to purchase my memory next time…What goes around comes around!! Thanks again…Shannon
Good instructions,
you could improve on the spelling (eg. it’s versus its) though…
Hi loved your video. Made it brain dead easy to upgrade my RAM. do you think you could do a vid on replacing/dismantling the screen I cracked mine recently and I need need need NEED your help!!!
Hi, Great video! I wish found it 2 days earlier. I removed the keyboard but I did not take off the clips which now that slot is chipped. It is possible to repair that piece or do I need to buy a new motherboard?
Thanks so much!
This is great!
Thanks for taking the time to put this together
EASY…EASY…EASY !!! Hardest part was getting the battery pryed off…3 screws, pop off keyboard and one screw on the memory shield. Put it all back together and you have a much better netbook performance experience.
Memory upgrade was a breeze. Thanks. My 1012 came with a 250GB 5400 rpm drive. I’d love to upgrade to a 320GB 7200 rpm. Will that generate too much heat or discharge the battery noticeably quicker? Also I got my 1012 from Sprint with a Qualcomm Gobi 2000 WiMax. I’m not using WiMax anymore, so can this be removed, and will that extend battery life? Thanks.
Which is the display data cable and how do I change it?
@Malcom, sorry, but I no longer have a 1012, so I can’t make a new video for the screen – however, dell’s illustrated guide is fairly straight forward if you want to have a go at it from that
@Henry, you won’t notice a battery life different if you swap out the wimax card (and alternatively, you could just disable it, if it’s not the same card as your wifi card). As far as the 5400rpm vs 7200rpm drive, the 7200rpm drives do increase the heat and battery consumption, but it depends on the particular drive as to how much for each (some battery/newer 7200rpm drives can draw less power than 5400rpm drives). There’s a good discussion about this over at overclock.net if you’d like to get a bit more opinions, but in short, you probably won’t notice any (10min or less, if any) battery life difference here either.
@Butch, if you take a look at the first (intro) image in this post with the motherboard showing, the display cable is the black sheathed cable coming from the right hinge that ends in a white horizontal connector that’s about an inch long – see it?
yes I found it last night. Now do I have to replace the whole monitor or can I just replace that piece? If so where can I get it and about how much does it usually run?
@Butch, yes, you can replace just the cable. You can try keeping a look out on ebay (I did a quick search and couldn’t find anything), or buy a broken 1012 and take the cable out. Alternatively, you can contact dell spare parts and see how much they would charge (no idea how much)
this is the part right?
http://www.ebay.com/itm/Dell-Inspiron-Mini-1012-LCD-Video-Cable-HFMW7-/160608920576?pt=LH_DefaultDomain_0&hash=item256509a400
they have them listed as Video Cables
How i express my thanks??? You are teaching very simply – basic idea to change HDD & RAM in Mini Laptops. Thanks a lot
Kannan.M
Great Directions!!! Where is the cmos battery located?
THANK YOU! Saved me from any crucial mistakes on my first DELL netbook disassembly.
it is very slow when my wife plays games on facebook and we already replaced the ram with a 2gb and still same thing. what else can it be and how can i fix thanks!
I have a dell mini 1012 and if i buy a 2gb card is ses with 1333 mhz or 1066 which do i need to take or make it no difrence. Sorry for my bad english. But ym from Holland. Thanks!
@Tomas – 1333 or 1066 sounds like that is DDR3, however, the Dell 1012 takes DDR2. Be sure to get DDR2 memory, and any speed 667 or higher should work
@Edgar – facebook games are most likely Flash games, if so, do you have the latest version of Flash installed? http://get.adobe.com/flashplayer/ (if you download from that link, I suggest un-checking the mcafee option )
I dropped my mini and was thinking something shook loose so I followed the video. Problem is I can find anythink loose. Screen is blue with white letteringmessage prompting me
What could this be in your opinion?
Excelente ayuda James, me fue de total utilidad!!!
Great instructions. 10 minute job, now have twice the memory. Thanks.
its really helpful!!!!!
guide me of selecting a good 4 gb ram for this, u may e mail me on *******@gmail.com
The dell 1012 cannot utilize 4gb of memory (it’s chipset limits itself to 2gb)
Thank you James, I had almost bought the DDR3 but DDR3 is not really or is that just for newer netbooks and laptops. So I have to look for ddr2 667 mhz or higher, then?
yep, that should would
Is this good ram? http://www.memoryshop.nl/product/103286/category-1310-intern-werkgeheugen/kingston-laptopgeheugen-2-gb-ddr2-800-mhz.html
yep, that should work fine
And this one? http://www.computerland.nl/a/geheugen_intern/13663761/adata_supreme_sodimm_2gb_800mhz_pc2_6400/details.aspx
yep, that should work fine as well
Here is a link to Dell’s Service Manual, etc. for the Inspiron 1012:
http://support.dell.com/support/edocs/systems/ins1012/en/index.htm
Cheers,
excellent, thanks Dan K.!
Cheers. Real simple guid i even managed to do it with a gerber and a pen. Also this is the first time i have opened a computer.
thanks again.
I am trying to replace the CMOS battery but can’t find it on the board….can anyone help.
@gordan.F – looks like it’s under the motherboard, so you’ll need to go a bit further than I did in my guide to remove it. Dell now has a illustrated service guide if you are up to it: http://support.dell.com/support/edocs/systems/ins1012/en/sm/coinbatt.htm#wp1179886
Your a genius man… thanks.. this helped me a lot.
Thanks for responding so soon. The problem when the notebook was opened, turned out to be a broken connection to the motherboard from the lead(s) starting at the chrome power button. The connection broke off of the motherboard. I am wondering if you can provide a solution to reconnect the (connector) plastic piece holding the positive and negative wires to the motherboard instead of ordering another motherboard. Thanks again for responding so soon, and also for your time. Mike