Just purchase a Dell Mini 1012 with the new Atom N450 chip? Want to upgrade the memory, hard drive, or pci-e cards but realized that Dell did not provide a service manual to assist in dismantling it (like they have for most other computers they sell)? Luckily, it’s as simple as removing 4 screws and the keyboard to replace the memory, and then 5 additional screws and prying off the palm rest bracket to get to the pci-e slots!
(note — should you decide to follow this guide, do so at your own risk – I take no responsibility for anything you may damage in the process :))
HD Video Guide:
Don’t want to watch the video guide? Continue on with the step by step picture guide below!
Remove the keyboard
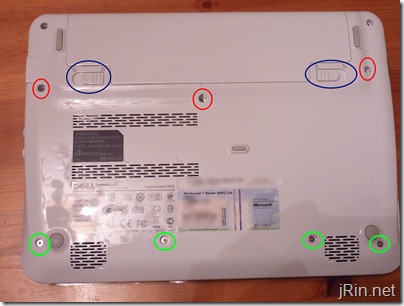
The first step is to remove the keyboard. It is held in by (3) screws on the underside of the laptop, as well as it’s data cable. Start out by flipping over the netbook and removing the battery by pressing the clips left and right [blue] to unlock it (then, remove it). Next, remove the (3) keyboard screws [red] – the one in the middle may not easily come out, but you need not worry about it as it will fall out once you actually remove the keyboard.
— while you’re at it, go ahead and remove the (4) bottom screws as well (green) – these hold on the palm rest and you’ll need to take them out eventually anyway —
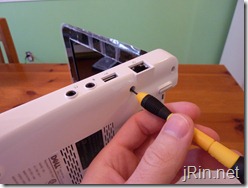
With the screws removed, flip it back over and open the screen to like a 90 degree angle and rest the laptop on it’s side. Take a small screw driver (or anything similar) and stick it through one of the left or right (depending what side the laptop is resting on) screw holes. This will push the keyboard out a bit so you can grab a hold of it on the other side in order to pull it out. Don’t pull the keyboard too far away because it is connected to the motherboard by a cable.
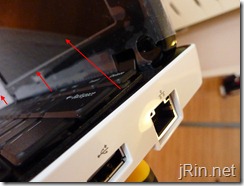
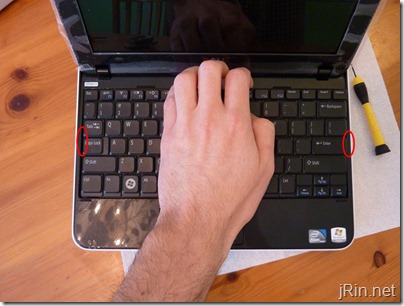
With the keyboard a bit loose, make sure it is free from the two clips on the left and right (red circles), and then flip it back over onto the palm rest (so the keyboard keys are resting on the palm rest / touch pad), again, remember that it is still attached to the motherboard via the data cable.
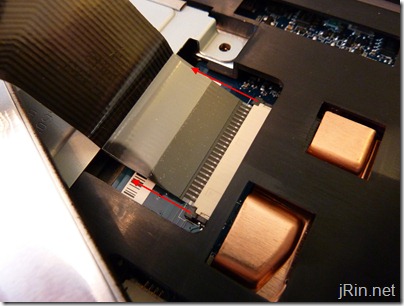
Now, we’ll remove the data cable – just simply push these two tabs out a bit (1mm or so?) to release the data cable and remove the keyboard entirely.
Remove touchpad and power button cable
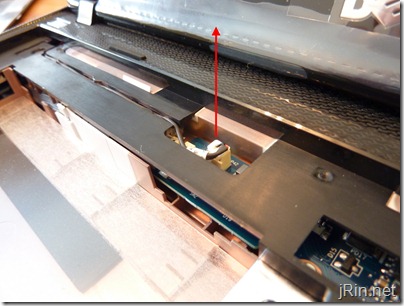
Simply pull out the power button cable from the motherboard (just pull up on the cable) – it is a little snug, so it will take a little bit of force,
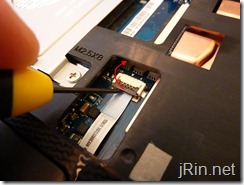
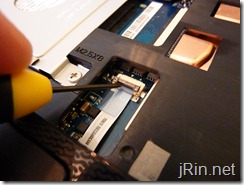
Then, pull/push up the latch holding down the touch pad data cable, and then pull it out:
Remove the memory, hard drive, and remaining palm rest/bezel screws
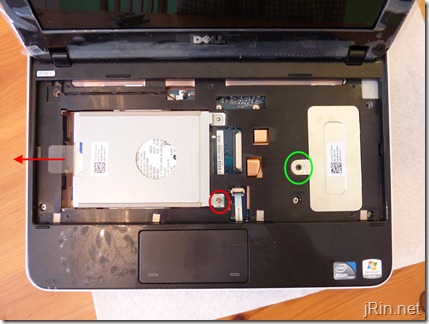
Remove the (1) screw holding in the hard drive [red] and slide the drive to the left and pull it straight up and out as well as the (1) screw holding on the memory access door [green]:
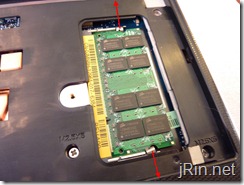
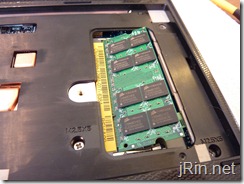
Remove the memory (and later replace this 1GB stick with a 2GB stick!) by pushing the (2) clips away from the stick (and the stick should then pop up).
Remove the palm rest bracket/bezel
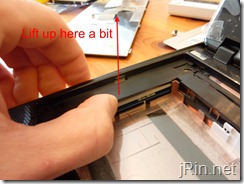
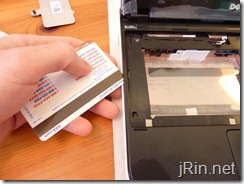
You will probably hear a lot of snapping and cracking during this process, but it will be okay! Start out by getting a credit card, lift up on the middle left part of the bezel (from the “insideâ€) and stick the credit card in the left side:
Continue to slide the card all around the palm rest with just the tip of the edge/corner of the card – this is when you’ll probably hear some snaps, crackles, and pops. It’s just the palm rest being released from the clips.
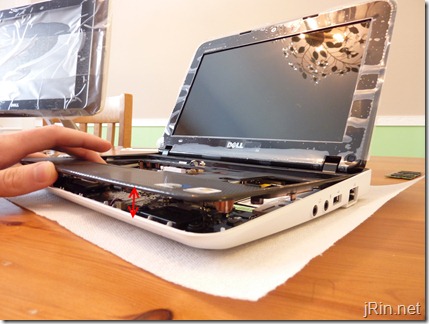
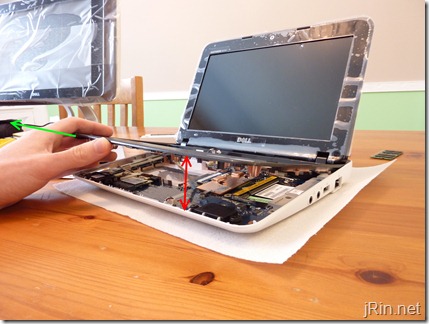
At this point, the palm rest should be fairly loose and you should be able to lift it up (from the front) only about an inch or so, as it is still attached near the screen:
Now, all you need to do is simply raise it up a bit more until you near it snap/crack, which should just be it being release from the clips at the screen, and then pull it free:
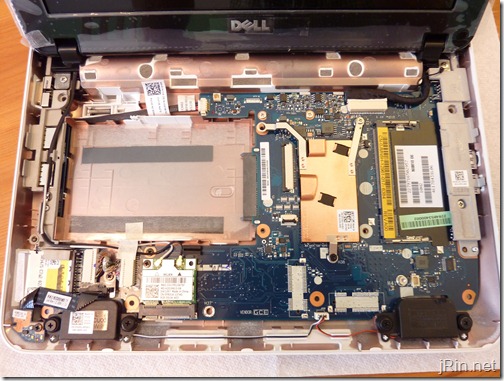
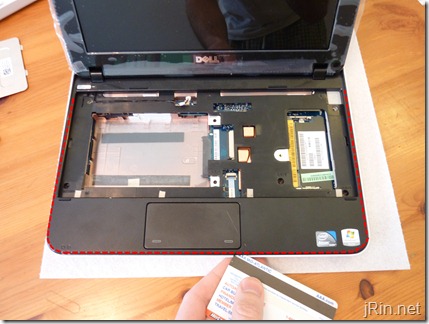
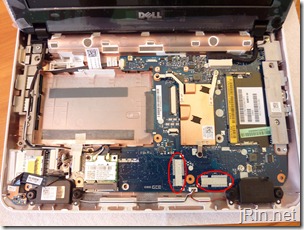
Congratulations, you now have access to the motherboard where you can replace/remove the mini pci-e cards / etc! To put it back together, basically do everything in the reverse order.
Unfortunately, I did not order mine with Bluetooth, TV tuner, hd decoder, etc so I am unable to show you what those look like – but as you can see, there are locations on the mother board for those headers (keep in mind, it appears that if you don’t order the netbook with bluetooth or the mini pci-e cards, the headers will NOT come on the motherboard, meaning, you cannot easily upgrade in the future):
for those of you looking for cheap 2gb memory sticks, all of the below options will work:
Sounds off in the comments about how dismantling and upgrading goes for you or if there are obstacles not mentioned here due to other pci-e cards being present — Good luck!

Pingback: Mini 1012 service manual
there are a couple pictures with what it looks like with the 3 pci-e slots:
@seattleboi1982, I think you’re right – In my particular system, one of them is occupied by the wifi card, and the other two are “missing”.
Pingback: Dell Mini 10 1012 Review | jRin.net
Thanks for the great instructions.. I used the video as a guide to upgrade my newly purchased DELL 1012 last week (Feb 2010). It worked perfectly and I now have a 1012 running with 2gb ram. I went with the DDR2 800mhz and I feel that there has been a very noticeable difference on the internet.
I am looking into purchasing the Crystal HD chip but still researching this option.
Just got done adding the 365 Bluetooth module to my Mini 1012. Pretty easy thanks to your dismantling guide. If anyone is interested in the BT module, Dell sells them new for $40 but you can get them through Dell’s refurbished sales (Dell Spare Parts, phone only) for $9.99 plus tax/shipping…cheaper and more reliable than eBay :-) Mine was about $18 all in. Don’t forget to ask for the screw.. I didn’t have nor ask for any spares so I just used the one from the power/hdd led board.
Pingback: upgrade questions for mini 1012
hello could some one post the exact tech details of the best ram upgrade (32 gb) for this ? I’m gonna receive this in a few days.
Thanks so much
Hey guys, just got my mini 1012 and upgraded the HD to a 320gb drive thanks to this guide :) Now I just need to find some cheap 2gb pc-5300 ram :D Also looking around for that 365 BT card. Question on that though: does it require any soldering? I saw that there are headers for it but wasn’t looking closely. If it’s a simple plug n play (and screw in to secure) I’ll be relieved.
Hey guys, just got my mini 1012 and upgraded the HD to a 320gb drive thanks to this guide :) Now I just need to find some cheap 2gb pc-5300 ram :D Also looking around for that 365 BT card. Question on that though: does it require any soldering? I saw that there are headers for it but wasn’t looking closely. If it’s a simple plug n play (and screw in to secure) I’ll be relieved.
@Jeremy, I just updated the end of the post with some links to possible memory choices (as low as $39 right now). As far as upgrading to bluetooth or the hd decoder card, it looks (from what I have) that if you did not order the netbook with it already, Dell does not put the headers (card slots) on the motherboard so it looks like you would have to try to find your own and solder them on (but I can only speak for my machine – I’m not sure if “newer” ones will have the headers or not)
Thanks!
I just successfully upgraded my wife’s 1012 with a 365 BT card, and just needed to plug in the connector. It also requires a very small screw, same as the mini’s mb screws. Although since I’m missing the pcie parts, I probably wont be able to do the crystal hd card, but it’s nice to have bt. Thanks for the excellent guide, James!
Does anyone know if there are any internal USB ports onboard, I hope to tap a USB port and hook up a USB hub internally and add things like 3G WWAN within the board
Credit Card, your flexible friend…
Thank-you very much for that – I have just bought a 1012 and was thinking about a better WLAN card, and I guess I may as well do the memory too … ;)
Is it possible to change the outside cover? And can you get them? I bought my wife a pinl Mini 10v, and I dont think they are changable between the units. I would like to give her the new 1012, but it have the black lid, would like to get and replace with a pink one … :)
Thanks!
i’m getting my 1012 in a couple days and i’m really hoping that a quick and easy install for the bluetooth and ram modules…the manufacture date is march 19th 2010, does anyone know if the headers will there for the bluetooth? cuz honestly soldering on my own sounds a bit to sketch…
James,
I think that your 1012 allows you to connect Bluetooth 365 module.
Google up for “Bluetooth 365” images and you will see that the connector marked JP22 which is directly above the right speaker (approximately 5mm above it) looks like the Bluetooth seating place.
And the aluminum minipole with the threaded hole in it is most likely the place where BT card is screwed to the keyboard. I do not know it for 100%, but I will be ordering Bluetooth 365 online now and we will see if my observation is right.
By the way, Kevin from Febr 27 – thank you for posting the “Dell Spare Parts” idea. This is what I will use tomorrow to buy Bluetooth 365.
Cheers
Pingback: Removing Keyboard
Pingback: HELP NEEDED - Using a Mini 1012 to Learn Linux Mint 9
Just installed a 2meg chip that I purchased off of e-bay for $43 shipped. Took about 10 minutes. Piece of cake. The little netbook does run quicker. Very worthwhile upgrade, and I can’t imagine why it comes with only 1 meg.
Just ordered a refurb 1012. Can’t wait to upgrade. It already has the bluetooth and tuner. Kingston an okay memory brand?
Pingback: My Experiences with Linux Distros on the Dell Mini 1012
Thanks for the excellent guide. If you only want to upgrade the memory, it is not necessary to disconnect the keyboard cable. I was able to expose and open the memory compartment cover by gently rotating the keyboard a bit.
Is there any way to upgrade the graphics card?
How can i upgrade the graphics card so i can play games such as MW2 or Halo 3?
What is pci-e?
@RJ, you can’t upgrade the graphics card on this netbook, or any netbook actually
@John, pci-e = pci express (more specifically, in the 1012, mini-pci-e — it’s just one of the card slots)
What does the pci-e do though,
@John, on the 1012, you can put in a Broadcom HD Decoder which would help with playing back hd video files
Oh so its pretty much for video playback?
There are other types of mini pci-e cards that you can get such as wwan (3G data card), wifi, bluetooth, ssd, and others but that’s all I can think of at the moment.
So a pci-e card is pretty much a variety of different modules in the netbook?
yah pretty much, just an expansion slot to add extra functionality
I understand now, Thanks a ton. Btw i really like the site
Pingback: ram upgrade. . .
Pingback: 1012 wireless card question - Page 4
great advice. moving from a mac to a mini so i know nothing, but i am going to try to add memory. the wireless card faulted so they replaced the card and i got to see the guts, but i am worried that the drivers might fail once i upgrade adobe– windows starter is 16 bit and techie advised me to upgrade … does anyone agree?
@deni, not sure what you mean by you thinking the drivers might fail once you upgrade adobe — adobe reader/flash player (assuming that’s what you mean by “adobe”) has nothing to do with the wireless card drivers. Also, windows starter is 32bit, and there’s really no reason to upgrade to windows 7 home/pro/ultimate unless you happen to need the extra features they provide (http://www.microsoft.com/windows/windows-7/compare/versions.aspx).
Will 2gb DDR2 pc2-4200 memory fit in my 1012 mini?
Thanks so much for posting this. I was able to upgrade the RAM in my Dell Mini 1012 using your instructions. I didn’t have to detach the keyboard, though. It was easy to work around it merely to replace the RAM.
RE: Deni’s message concerning upgrading Windows 7 Starter. I upgraded to Windows 7 Pro on my Dell Mini 1012, and it works like a dream. No problems at all. I did upgrade the RAM to 2 GB though too. — Also found out through “just trying it” that Ubuntu Netbook Remix works fabulous on the 1012–I didn’t even have to install any drivers to make it work! But I did find that I would be at a loss for the printer drivers. Kept the UNR on a USB stick should Windows 7 ever fail me. I can boot from the USB stick easily.
fyi
Dell Mini 1012, Dell Online Manuals
http://support.dell.com/support/edocs/systems/ins1012/en/index.htm
available pdf or html, view online or download
Initial release: 04 January 2010
Last revised: 08 March 2010
thought you might like to update your page
Thank you so much for video! Was really struggling with re-attaching the keyboard cable, Dell’s instructions never would have gotten me there. I played and replayed your video until
I “got it”!
Much appreciated….
TJ
Be careful with the keyboard clip. It doesn’t come out very far. I broke the catches on mine, so the only thing retaining the ribbon is just the clip pushed in and pressure on the ribbon from carefully replacing the keyboard.
Also, I imagine the sim card slot is useless without an internal 3g wwan card? Does it come with antennas that have to be run?
My next goal is to remove the camera from the monitor. I use the 1012 for work in places that I shouldn’t be bringing cameras so.. Anyone got any leads on that? Thanks.
Pingback: Dell Mini 1012 « Random Thoughts
Pingback: Dell Mini 1012 Bluetooth and Memory Upgrade « Random Thoughts
i tried to swap the ram and when i powered back up, i get nothing? the hard drive sounds like it is spinning and the left light of the 2 lights on the bottom left side of the keyboard is illuminated constantly
please help
jl_conley@comcast.net
I don’t know about taking mine apart. It’s not a desktop computer, its a tiny notebook. I may have to save some money up and get someone else to upgrade it for me in the future. All I know is that Windows 7 is slow even with 1 GB of RAM.
I just upgraded my wifes 1012 using a card out of my own laptop…It’s like giving her a kidney or something, lol, but my question is 2gb as much as we can give this thing? I know they make 4gb memory… can you pop one of those in there? why or why not?