Just purchase a Dell Mini 1012 with the new Atom N450 chip? Want to upgrade the memory, hard drive, or pci-e cards but realized that Dell did not provide a service manual to assist in dismantling it (like they have for most other computers they sell)? Luckily, it’s as simple as removing 4 screws and the keyboard to replace the memory, and then 5 additional screws and prying off the palm rest bracket to get to the pci-e slots!
(note — should you decide to follow this guide, do so at your own risk – I take no responsibility for anything you may damage in the process :))
HD Video Guide:
Don’t want to watch the video guide? Continue on with the step by step picture guide below!
Remove the keyboard
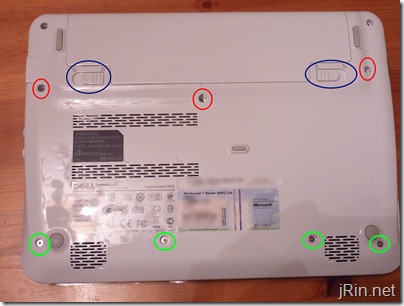
The first step is to remove the keyboard. It is held in by (3) screws on the underside of the laptop, as well as it’s data cable. Start out by flipping over the netbook and removing the battery by pressing the clips left and right [blue] to unlock it (then, remove it). Next, remove the (3) keyboard screws [red] – the one in the middle may not easily come out, but you need not worry about it as it will fall out once you actually remove the keyboard.
— while you’re at it, go ahead and remove the (4) bottom screws as well (green) – these hold on the palm rest and you’ll need to take them out eventually anyway —
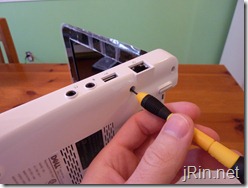
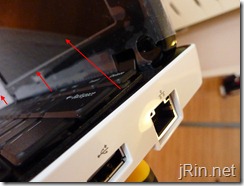
With the screws removed, flip it back over and open the screen to like a 90 degree angle and rest the laptop on it’s side. Take a small screw driver (or anything similar) and stick it through one of the left or right (depending what side the laptop is resting on) screw holes. This will push the keyboard out a bit so you can grab a hold of it on the other side in order to pull it out. Don’t pull the keyboard too far away because it is connected to the motherboard by a cable.
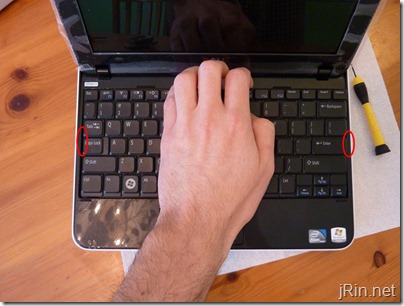
With the keyboard a bit loose, make sure it is free from the two clips on the left and right (red circles), and then flip it back over onto the palm rest (so the keyboard keys are resting on the palm rest / touch pad), again, remember that it is still attached to the motherboard via the data cable.
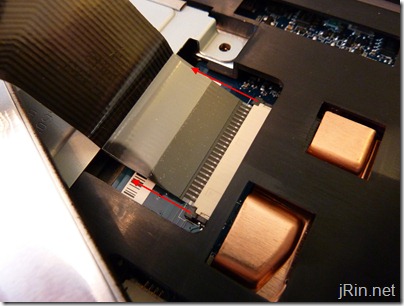
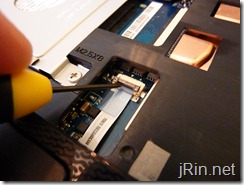
Now, we’ll remove the data cable – just simply push these two tabs out a bit (1mm or so?) to release the data cable and remove the keyboard entirely.
Remove touchpad and power button cable
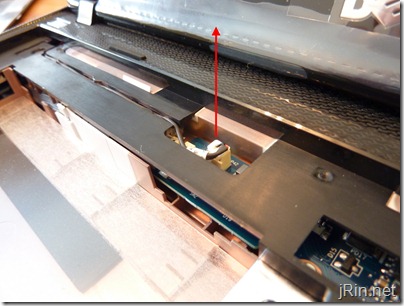
Simply pull out the power button cable from the motherboard (just pull up on the cable) – it is a little snug, so it will take a little bit of force,
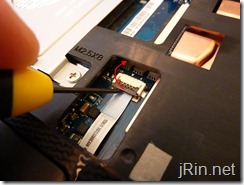
Then, pull/push up the latch holding down the touch pad data cable, and then pull it out:
Remove the memory, hard drive, and remaining palm rest/bezel screws
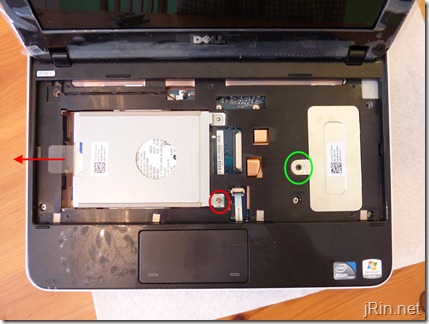
Remove the (1) screw holding in the hard drive [red] and slide the drive to the left and pull it straight up and out as well as the (1) screw holding on the memory access door [green]:
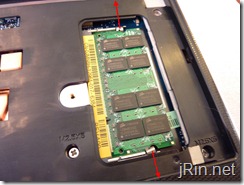
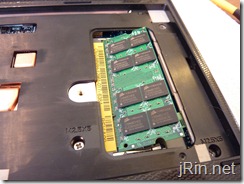
Remove the memory (and later replace this 1GB stick with a 2GB stick!) by pushing the (2) clips away from the stick (and the stick should then pop up).
Remove the palm rest bracket/bezel
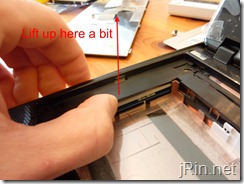
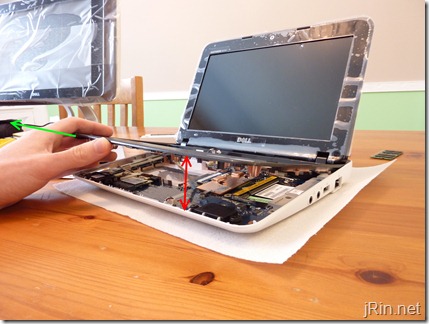
You will probably hear a lot of snapping and cracking during this process, but it will be okay! Start out by getting a credit card, lift up on the middle left part of the bezel (from the “insideâ€) and stick the credit card in the left side:
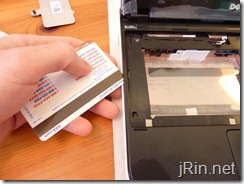
Continue to slide the card all around the palm rest with just the tip of the edge/corner of the card – this is when you’ll probably hear some snaps, crackles, and pops. It’s just the palm rest being released from the clips.
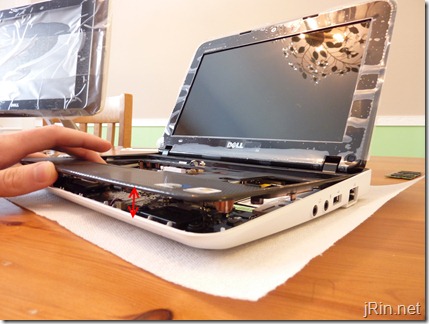
At this point, the palm rest should be fairly loose and you should be able to lift it up (from the front) only about an inch or so, as it is still attached near the screen:
Now, all you need to do is simply raise it up a bit more until you near it snap/crack, which should just be it being release from the clips at the screen, and then pull it free:
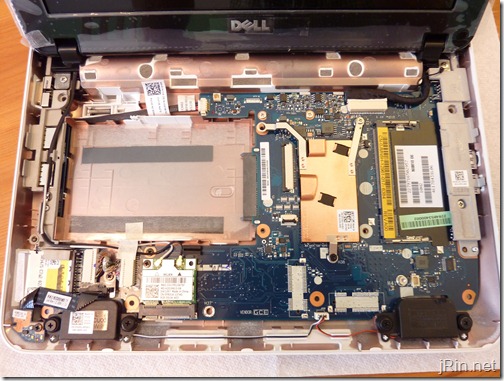
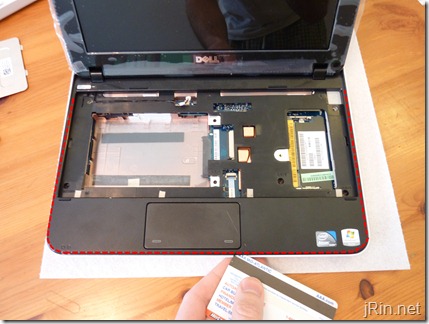
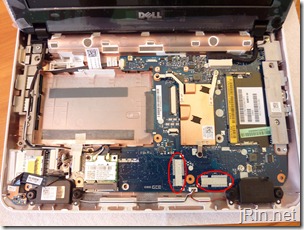
Congratulations, you now have access to the motherboard where you can replace/remove the mini pci-e cards / etc! To put it back together, basically do everything in the reverse order.
Unfortunately, I did not order mine with Bluetooth, TV tuner, hd decoder, etc so I am unable to show you what those look like – but as you can see, there are locations on the mother board for those headers (keep in mind, it appears that if you don’t order the netbook with bluetooth or the mini pci-e cards, the headers will NOT come on the motherboard, meaning, you cannot easily upgrade in the future):
for those of you looking for cheap 2gb memory sticks, all of the below options will work:
Sounds off in the comments about how dismantling and upgrading goes for you or if there are obstacles not mentioned here due to other pci-e cards being present — Good luck!

Excellent guide! I didn’t realize Dell had finally published a service manual, and this was the first Google result for “Dell 1012 memory change.” A mis-ordered SODIMM for another computer project just found its way into my netbook in under 10 minutes and is running like a champ. I’m sure I would have figured out which screw was which eventually, but this guide just made life that much easier. :) Thanks!
For info, newly installed RAM is a cheap Rendition 2GB DDR2 PC2-6400 stick (RM25664AC800) from Newegg.
Pingback: How to upgrade the Dell Inspiron 1121 (11z) | jRin.net
it’s a neat and meaningful guide. appreciate it.
Thanks for the guide, but I had problems with the keyboard data cable. Now my keyboard does not work. My 1012 has a much shorter cable than yours, making it difficult to work freely with removing and re-inserting the data cable. The tan plastic piece with the tabs on each end came completely out, and now will not slide back in firmly. My keyboard now has only a few keys that work. Possibly I damaged my motherboard? Thanks.
@Ted, I realize I’m a bit late in responding to you, but did you ever get this sorted? If the grey tab/tabs that hold the keyboard ribbon cable broke off, you may be out of luck. You can *try* to put the ribbon cable all the way back in to how it should be and then use some masking/scotch tape to tape it down securely (perhaps cut out a piece of credit card to place on top of the cable where it touches the motherboard to help the tape hold it firmly against the contacts). But the fact that you say the cable isn’t “attached firmly” and that only some of the keys work is a sign that the ribbon cable isn’t making complete and full contact to the motherboard. (the grey tab/tabs make sure to press the entire width of the ribbon cable firmly against the contacts on the motherboard).
Thanks for the tutorial! Nice work!
This is the second time I have used this site to upgrade memory in a Mini 1012. Your tutorial gave me the confidence to take the first one apart and now a few months later it was a great refresher for doing the second one. Thank you!
Thank you for the information, thought you did a great job explaining the process and it helped me out a lot. Again thanks a lot.
Mine just quit working, Dell tells me after the tests we did over the phone that is is probably the motherboard. They want a silly amount of money to repair it. Assuming I can find a motherboard, is changing the motherboard as simple as removing the bad one and installing the good one and I’m then good to go?
TIA
@Rich, correct, “all” you have to do is swap the motherboard and you don’t need to worry about anything else – assuming everything else (hard drive, memory, etc) is fine. You won’t need to reinstall your OS.
this document is very helpfull thanks a lot
I’ve never upgraded the memory before. Will any information need to be transferred or is it just as simple as replacing it for a new one?
@SLee, nope, just swap the memory sticks and you’re good to go!
What screw driver did you use? What size? Im trying to look for one and its rather hard. :(
I usually use these for all my dismantling, but when I need even smaller drivers I use these
Great! Thanks! Done!
Hi James,
do you know if there is a backlit keyboard for the 1012?
Your how-to videos and pics are great… Thanks!
@Walter, nope, unfortunately no backlit keyboard option for the 1012, but thanks for the kind words!
Hi James,
Thank you so much for taking the time to provide this hugely useful guide. The hardest part was removing the battery and putting that fiddly keyboard cable back in!
Just wanted to let you know that your written guide is missing a step to remove the 3 screws that hold the palm rest bracket from the top. In the video, you have this step at 3:16 but it’s skipped in the written guide and there are no pictures either.
Picked this up because I was using the written guide first and thought it can’t be right that those 3 screws don’t need to be removed! Would be great if you could add this in to the written guide to save anyone from breaking their palm rest bracket by trying to remove it whilst it’s still secured.
Kind Regards,
Grumpy Bear
Hi James,
Thank you for the instruction. It was easy to chance my RAM thanks that. My problem is that after I change it I end up with a black screen. The laptop gets on and I can hear the fan, but that’s it. Any idea what I did wrong? Thank you.
Gap
Either the RAM you used is not compatible, is not seated 100% correctly (try reseating it before you do nothing), or the RAM you got is DOA (in which case call the person or company you bought it from, tell them and they will send you a new one). Nothing is broken, don’t worry
nice….thank you,my girlfriend will enjoy1
the best guide ever,tnx man!
Thanks, great guide. It’s worth mentioning that it is not necessary to pull the power cable, nor to remove the screws under the palm rest, if all you are doing is replacing the RAM chip or the hard drive.
@Chris, you definitely want to unplug the power and battery before working on the computer.
I would like to add to this that there is an easy way to tell if you can upgrade/exchange the memory on these models.
I found this out wile upgrading a US version on wich the customized daughterboard did not feature an SPD chip(The small chip that identifies the configuration(speed/structure/capacity) of the DRAM module that the computer reads during boot).
If you are in doubt, just run the freeware program CPU-Z(www.cpuid.com), and you will find no values in the SPD part. If this is the case, you can not change it for a generic module. This might save people a lot of fiddling with the screwdriver.
I did opt the user to put in a class 10 SD card of 8GB, and use readyboost, it does gain somewhat of a performance, and costs next to nothing these days.
HI
I have a dell inspiron 1012 but I forgot a pasword ,I am from Albania ,When I want too start its ask for HDD pasword ,I frien d of me sed too me that I have to take of the system batery for a a short time ,do you now if that work for a Bios pasword.This is a tag service number 4WXGVM1.Pleas help to me becaaus I cant contact a dell company from my contry.Thankyou
If its the HDD you might have to just wipe the HDD. In this case get a live usb recovery and create a recovery usb before you wipe, you can look this up online. If its the BIOS look up online how to reset the CMOS. This will reset the BIOS and password.