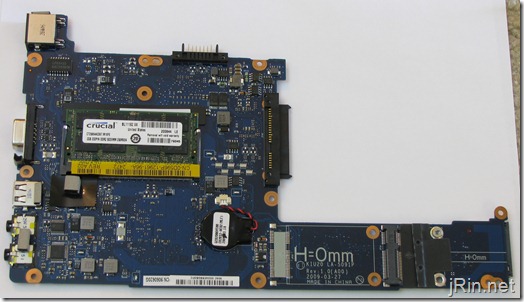
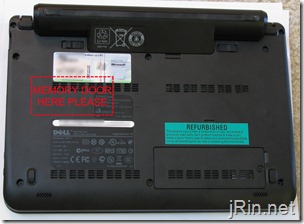
As opposed to simply providing a removable door (like they did for the mini-card) to upgrade the memory, Dell decided to make it difficult by requiring you to dismantle the entire laptop… (but what do I know, maybe it would affect structural integrity or something to add a door?).
So, in light of this fact, here is a step-by-step how-to video (and pictures) on how to upgrade the memory! All you will need is time, a set of mini screw drivers, and patience!
While following this video, I would highly recommend having the Dell created service manual to follow along in case anything shown here is unclear/etc:
http://support.dell.com/support/edocs/systems/ins10v/en/sm/memory.htm#wp1180987
Since YouTube caps videos at 10 minutes, I broke it up into:
Taking it apart and adding the memory:
and then another putting it all back together:
Or, or those who prefer a guide using pictures as opposed to video:
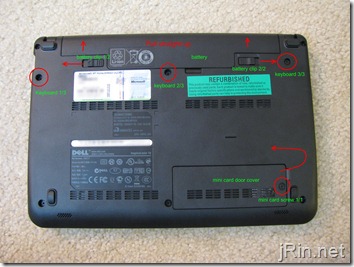
1. Start out by removing the battery by sliding out the battery lock clips, and then pull the battery straight out. Then remove the (3) screws holding in the battery and the (1) screw securing the mini-card door, and remove the door.
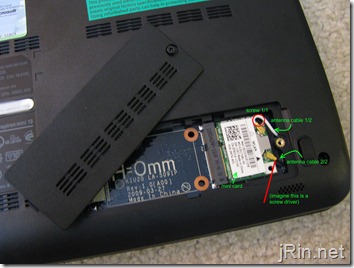
2. Remove the mini card. Gently pry off the two antenna cables by, for example, placing a small screw driver underneath the cables where the gold metal and cable meet – then softly prying it up. Then, remove the single screw holding the mini card down, then pull out the card.
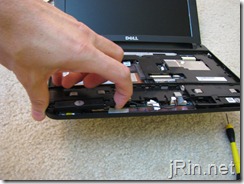
3. Remove the keyboard and it’s ribbon cable, as well as the ribbon cable for the touchpad. You’ll need to basically use a very thin flat head screwdriver, credit card, etc in order to ‘pry up’ the keyboard from the center near the screen. Once you are able to get your fingers underneath it, just pull up on the right and left sides until the laptop is free: 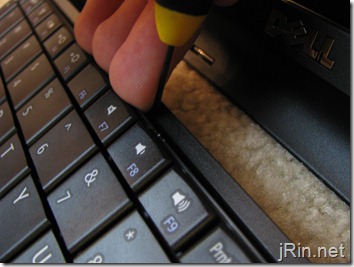
(there are small clips holding the eayboard in on the right and left, just pry the keyboard up as if there is a hinge at the palm rest and it’ll come loose). Don’t pull the keyboard too far from the chassis as it’s still connected via it’s ribbon cable: 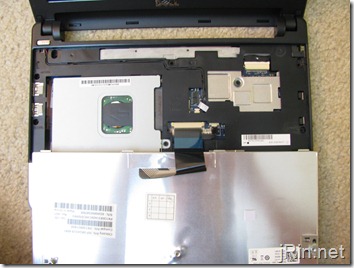
With the keyboard free, remove the ribbon cable(s) by sliding out the left and right grey “clips†holding the ribbon cable(s) in. (they will “slide out†about 2mm or so) 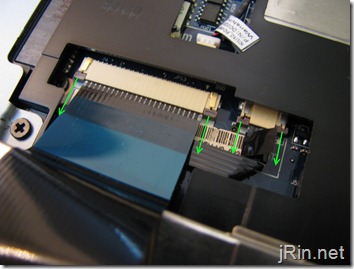
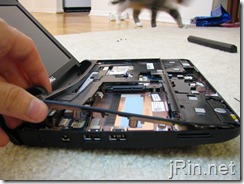
4. Remove the palm rest. This can be a bit frustrating, but basically you want to use your thumbnail / thin creditcard to start prying from the left and right edges, where it meets the bracket:
5. Prep for palm rest bracket removal. First, go ahead and remove the 1 screw holding in the hard drive, and slide it out (blue). Then, unplug the 3, or 4 if you have bluetooth, cables (green). Finally, unscrew the 4 screws securing the palm rest bracket from the top (red). 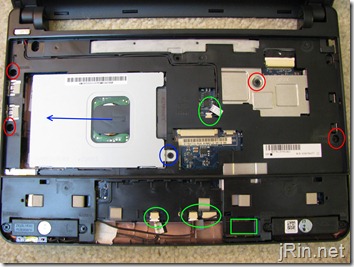
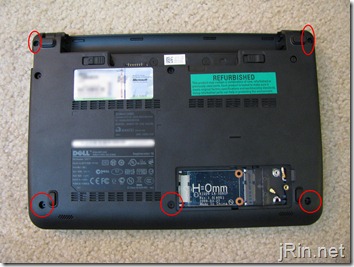
Turn the netbook over and remove the 5 remaining screws securing the palm rest from the bottom:
6. Actually remove the palm rest bracket. Dell suggests starting from the hinges and working down, but I was unable to undo the clips here to start. So instead, I started at the speakers (which are already loose), and started prying off the bracket from here. Basically, just start pulling the entire bracket up, working your way from the palm rest area up towards the hinges, until it is removed. (that being said, once I started getting the bracket unclipped half way to the hinges, I was able to pry off the hinge-area):
7. Prep system board (motherboard) removal. Almost there! Now you need to unplug the 3 remaining cables (green) and 2 screws (red). It may not matter, but when removing the display cable (top right), pull from the middle of the cable, as that’s where all the wires are bunched: 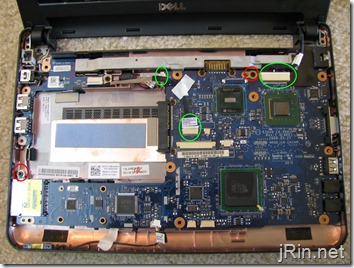
8. Remove the motherboard. The board is now completely loose from the chassis and can be removed! Be careful not to nick it on anything while pulling it off, but it’s relatively easy not to. Flip over the board, release the memory and pop in your 2GB stick:
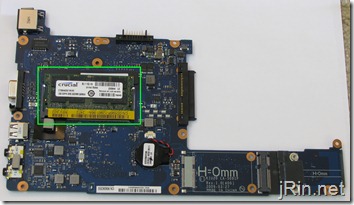
9. Put everything back together. Basically, just follow all theses steps in reverse, power on the system, and enjoy your 2GB Dell Mini 10v!
Have any questions or run into problems? Find an easier way to pry apart the palm rest bracket or etc? Let everyone know in the comments!
For those of you who haven’t bought a 2gb stick yet, there are plenty on amazon that would work fine (too bad prices for ddr2 memory aren’t as cheap as they used to be) – I will keep this list updated with the cheapest amazon memory prices as I see them:
And for those interested in the products I used to help create this post:

Excellent work, I’m done without a scratch. A computer toolkit I picked up had some plastic pry-bars which helped. Now where did I put that Snow Leopard disk:)) Cheers!!
This is for mark on feb.2, 10. i was trying to get that ram for $35 from dell, but having trouble. was that a past promotion and no longer have it anymore? PLeasse reply, thanks!
Hi, this is a great article. Just an idea, what about giving the size of the places where to drill in order to people who could want to cut a memory door? Great work over there, Daniel.
Thanks for this!
Why they made this so difficult is beyond me.
Just a note, on my refurbed 10v, the screw was stripped on the wireless card, so I couldn’t get it out.
I was able to wiggle the motherboard out without taking out the wireless card, after disconnecting the antenna wires. There’s a piece of plastic you have to pull it around though, so I pretty much had to bend the board a bit to get it out and back in. o.O
Works great now though! Thanks! Running Snow Leopard with NetbookInstaller and it’s awesome!
Thank you so very much for the video. You are a lifesaver! Direct and fast forwarded at all the right sections. Great work.
Great howto. Worked like a champ!!!
This was an awesome breakdown. I saw another video or two on youtube of how to do this, but yours was really simple. Thanks! I followed along at home and it worked like a champ. Rocking 2GB now.
What a great guide. Thanks for this! But if you (or anyone capable reading this) would indulge an utterly newbie sort of question: What type of memory module do I need? Dell lists the built-in module als DDR2 533MHZ. Now, I know that my 2GB module will also have to be DDR2 to work, but does it have to be 533MHZ? Or could I also use the 2GB DDR2 333MHZ module that I have lying around from my previous laptop? Any help is much appreciated.
Thanks for this, clear and easy to follow. Wish when my HR manager asked if it was easy to upgrade memory in a laptop I had said no however!
Shame on you Dell……
Awesome video. I have never added memory to a computer and because of your instructions I was able to do it in 40 minutes. Appreciate the time you put into this.
Thanks for the video’s… Very helpful and the 2gig made a HUGE difference when surfing the web on the 10v
Great instructional video and guide. I was wondering, Is there a way that a Dell mini 10’s RAM can be upgraded to 2gb? I’ve heard its been soldered on the motherboard and would the whole mini 10 system can accommodate the 2gb RAM?
great guide! I used a kingston DDR2 PC6400 (800Mhz) module as it was cheaper and it works perfectly.
Great tutorial! I just went through your instructions and had zero questions. The only thing I ran into was the screw that holds the radio in on the bottom was too tight and got stripped. Not a big deal though since it really didn’t need to come out. I bought the 2GB RAM from Crucial for $47.99 which was only a couple of bucks less than Dell but the Dell rep had no idea what she was doing and then kept trying to sell me an extended warranty the whole time we were on the phone.
Anyway, the Mini 10v netbook runs much better with the 2GB installed. Now I just hope my wife will be happy.
perfect walkthrough, thanks mad life nice and simple
my understanding is that this motherboard like many atom n270’s is limited to the pc4200 ddr2 speed so you can use pc 4200, 5300, or 6400 but not the lower speed mentioned above.
any corrections? else i am going to save some moola and put in the pc4200.
nice job above. after the third set of internal screws, i was thinking … can i use my dremel and create a memory access door :)
Thank you, worked perfectly!
hello guys…i opened mine and the memory chip is combined with the processor. In the slot that goes the memory( I can remove if I want to with a 200pin slot) it also has the processor on it…
I guess no upgrade for me
@Sidney,
Sounds like you have the dell mini 10 (not 10v) which is not upgradable, I assume it also has an HDMI port (which the 10v does not have)?
Great break down, thanks. My Mini 10v is now flying along, well it’s a bit better anyway (:
Worked for me! My 10v is now rockin’ 2GB. Thanks so much for putting this together.
Hey, great guide, very helpful. I do have one correction and one suggestion though.
Correction: the screws in step 7 are incomplete – to the left of the top “red” screw are two other screws that also hold the motherboard down.
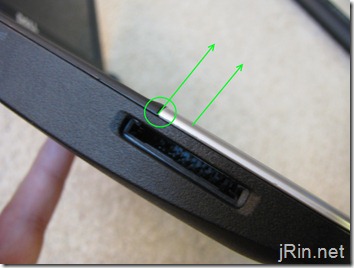
Suggestion: In step 4, to pry off the palm rest, you can actually push the palmrest from underneath through the SD card slot. I found this out after mangling the plastic a bit, but it came up so easily that I, erm, discovered it.
Again, thank you so much, now I have DDR2 5300 although as I understand it we only need 4200 RAM.
This guide worked like a champ. Much appreciated!!!!
Hi. I noticed that many of you have the Dell Mini 10v with the n270 atom processor and 533 Mhz FSB and thus 533Mhz SODIMM DDR2 RAM. my understanding is that there is a new Mini 10v (mine in in delayed production now at Dell) and the FSB on this new only slightly faster (miniscule) processor is 667 Mhz. So you cant use the slower 533 Mhz ram on this chipset and processor.
Anyone hear different? Of course faster RAM 667 or greater in a SODIMM 200 pin, DDR2 configuration should still be fine.
Does anyone from Dell read this site? Come on people… Memory access door? The guys at Lenovo know how to make everything accessible by a simple door, memory, hard drive, WIFI Card, … looks like the followed my acer aspire one A150 manufacturer’s guidlines and made everything hard to take apart… broke my bezel trying to get it off my Acer. *&#(&E$(&#!!!!
for those who are interested, amazon has 2gb ddr2-800 on sale for $28.70 at the moment (it may go up at anytime) OCZ OCZ2M8002G PC2-6400 CL 5-5-5-15 DDR2 800MHz SODIMM 2GB Module
Great instruction. However, I’ve stripped one of the screws on step 5 (red circles), it’s now worn out, can’t get it out. Any idea how to get it out? Please email me to giahuyatlanta@yahoo.com. Any suggestion would greatly appreciated.
Thanks – Instructions are great. The only slight problem I had was getting the wlan black cable reconnected – it was very fiddley but finally got there. Even though I stumbled a bit on the wlan reconnection it took me less that 30mins.
Thanks the the easy to use instruction.
Does anyone know if the lid will come apart on the Mini 10v? My cam stopped working. If I press hard around the cam it comes back on so I would like to take a look inside the lid to see if I can spot the trouble. Any help is greatly appreciated.
Great Guide! Followed during my lunch break and got it done with time for a Pepsi and to see Snow Leopard gain some extra life! Thanks for the great tutorial!!
Thank you for the thorough instructions. It was certainly easier than replacing a hard drive on a 12″ Mac Powerbook. With your instructions it was a snap!!!!
Pingback: Memory upgrade from 1gb to 2gb...easy!
When i put in the new memory and put it back together and turned it on all i got was a beeping sound that would not stop. what is the problem… do i have to undo all of this again??
sounds like the memory isn’t seated right…
Also it is possible a connector wasn’t connected correctly…
Was able to install the new RAM…but now the display’s not working. Checked the display cable…looks okay…all the other cables are where they ought to be…no system beep at startup, so I figure it’s just the display, but like Jordan314, I had to bend my motherboard a little bit, so maybe I broke it… :(
Excellent tutorial – thank you so much. The keyboard was much easier to get out on mine than it looked in the video. Maybe they changed the attachment mechanism. I broke one of the plastic clips holding the palm rest down – oh well… it is still solid with the remaining ones. I installed Corsair PC5600 RAM (2GB) and it makes my little netbook fly. Next up: BIG hard drive. Thanks again!
Perfect, clear instructions. Couldn’t have done it without them. Thanks!
Great tutorial, updated my Dell to 2gb without a scratch!
Do you need to remove the mini card as when i replaced it before i managed to strip the screw now unable to remove it, any tips on get it out?
There’s no door whatsoever on the bottom of my Inspiron 10. WTF do I do now?
Also, why the hell did Dell downgrade with a new model and leave out some kind of removable bottom? Wouldn’t that move the RAM closer to the interior and stop it from dissipating heat effectively? Do they enjoy screwing me once again? (Then again, it was a free $300 netbook gotten during a promotion. Doesn’t make me not wish they instead gave me that $300 ASUS netbook I saw at Costo, though.)
Also, what the heck’s up with memory prices? Is there suspicion of manufacturer’s price fixing? I remember buying two 1 gig sticks and a 2 gig stick of PC6400 a year ago, off Newegg, for less than 40 bucks, and still thought I paid too much.
@BK — you can just remove the antenna and be fine, I don’t think it would be necessary to remove the card itself
@h8gwb — memory prices are likely higher because DDR3 is the “new standard” and they are probably being made in higher quantity than ddr2 chips so there is a lower supply of ddr2 than there used to be
Pingback: How to upgrade Dell Mini 10v memory – Part 2 (reassemble) | How to How to upgrade Dell Mini 10v memory – Part 2 (reassemble) Video | HowTubely - How to Videos
Awesome video write up… couldn’t be doing it without it, the only thing I’m stuck at now is the fact that I received the wrong screen for my son’s mini 10V (lvds connector on opposite side so it won’t reach to the mb) he stepped on it and fubared the screen so I’m killing two things in one shot and upgrading to 2gb and replacing the screen.
Pingback: Unable to make changes in BIOS - Page 2
The screw holding in the mini-card got stripped with the first try. Couldn’t remove it, therefore couldn’t go any further. Any tips?
Great tutorial. You made it super easy for me. Thanks.
I UPGRADE MY 1010 OR NOT???
@D.S., you actually may be able to continue without removing the card. Just simply remove the antenna cables and b ecareful when pulling the motherboard out to not nick the wireless card or anything (I don’t think having the card in there should prevent you from pulling the motherboard out)
@VaRags, if you are asking if you can upgrade the memory in a dell mini 1010, the answer is no, because the memory that is currently installed is soldered to the motherboard
Thanks
Maybe I can make any of the other upgrade?
Thanks for spending the time to put this guide together – it really helped with the tricky bits like getting the palm rest off without making a mess!