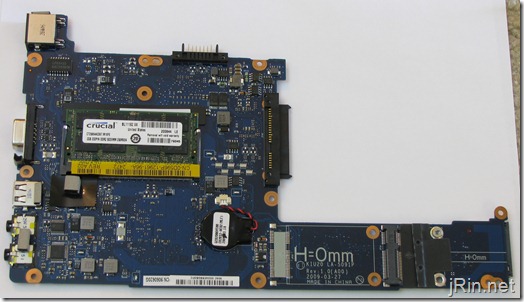
As opposed to simply providing a removable door (like they did for the mini-card) to upgrade the memory, Dell decided to make it difficult by requiring you to dismantle the entire laptop… (but what do I know, maybe it would affect structural integrity or something to add a door?).
So, in light of this fact, here is a step-by-step how-to video (and pictures) on how to upgrade the memory! All you will need is time, a set of mini screw drivers, and patience!
While following this video, I would highly recommend having the Dell created service manual to follow along in case anything shown here is unclear/etc:
http://support.dell.com/support/edocs/systems/ins10v/en/sm/memory.htm#wp1180987
Since YouTube caps videos at 10 minutes, I broke it up into:
Taking it apart and adding the memory:
and then another putting it all back together:
Or, or those who prefer a guide using pictures as opposed to video:
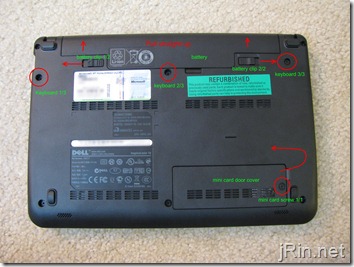
1. Start out by removing the battery by sliding out the battery lock clips, and then pull the battery straight out. Then remove the (3) screws holding in the battery and the (1) screw securing the mini-card door, and remove the door.
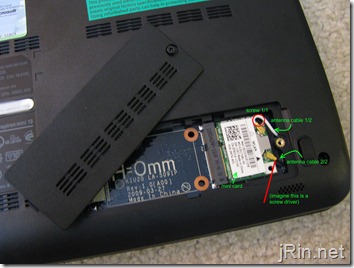
2. Remove the mini card. Gently pry off the two antenna cables by, for example, placing a small screw driver underneath the cables where the gold metal and cable meet – then softly prying it up. Then, remove the single screw holding the mini card down, then pull out the card.
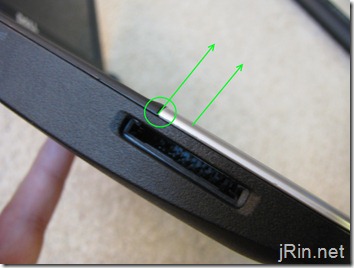
3. Remove the keyboard and it’s ribbon cable, as well as the ribbon cable for the touchpad. You’ll need to basically use a very thin flat head screwdriver, credit card, etc in order to ‘pry up’ the keyboard from the center near the screen. Once you are able to get your fingers underneath it, just pull up on the right and left sides until the laptop is free: 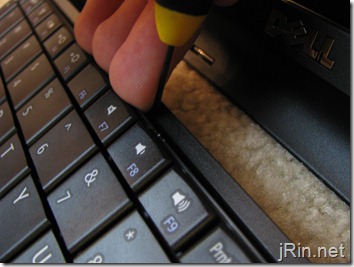
(there are small clips holding the eayboard in on the right and left, just pry the keyboard up as if there is a hinge at the palm rest and it’ll come loose). Don’t pull the keyboard too far from the chassis as it’s still connected via it’s ribbon cable: 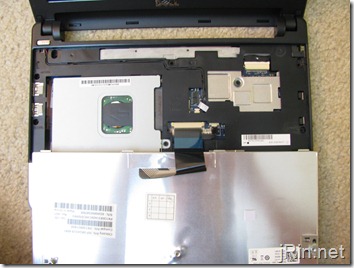
With the keyboard free, remove the ribbon cable(s) by sliding out the left and right grey “clips†holding the ribbon cable(s) in. (they will “slide out†about 2mm or so) 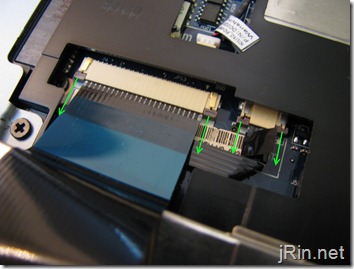
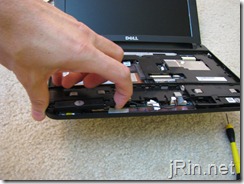
4. Remove the palm rest. This can be a bit frustrating, but basically you want to use your thumbnail / thin creditcard to start prying from the left and right edges, where it meets the bracket:
5. Prep for palm rest bracket removal. First, go ahead and remove the 1 screw holding in the hard drive, and slide it out (blue). Then, unplug the 3, or 4 if you have bluetooth, cables (green). Finally, unscrew the 4 screws securing the palm rest bracket from the top (red). 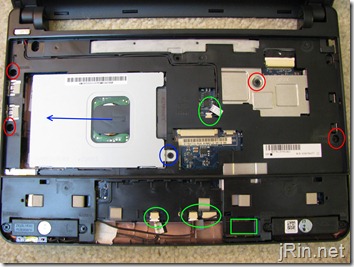
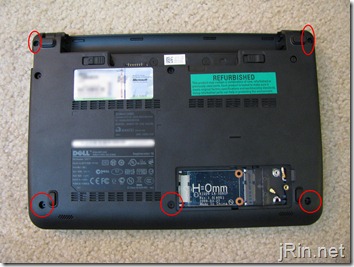
Turn the netbook over and remove the 5 remaining screws securing the palm rest from the bottom:
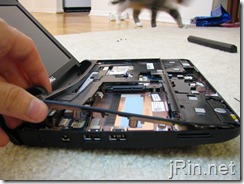
6. Actually remove the palm rest bracket. Dell suggests starting from the hinges and working down, but I was unable to undo the clips here to start. So instead, I started at the speakers (which are already loose), and started prying off the bracket from here. Basically, just start pulling the entire bracket up, working your way from the palm rest area up towards the hinges, until it is removed. (that being said, once I started getting the bracket unclipped half way to the hinges, I was able to pry off the hinge-area):
7. Prep system board (motherboard) removal. Almost there! Now you need to unplug the 3 remaining cables (green) and 2 screws (red). It may not matter, but when removing the display cable (top right), pull from the middle of the cable, as that’s where all the wires are bunched: 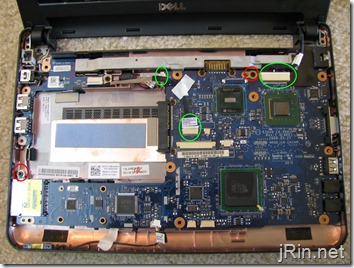
8. Remove the motherboard. The board is now completely loose from the chassis and can be removed! Be careful not to nick it on anything while pulling it off, but it’s relatively easy not to. Flip over the board, release the memory and pop in your 2GB stick:
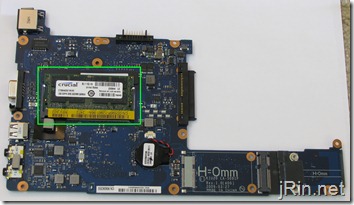
9. Put everything back together. Basically, just follow all theses steps in reverse, power on the system, and enjoy your 2GB Dell Mini 10v!
Have any questions or run into problems? Find an easier way to pry apart the palm rest bracket or etc? Let everyone know in the comments!
For those of you who haven’t bought a 2gb stick yet, there are plenty on amazon that would work fine (too bad prices for ddr2 memory aren’t as cheap as they used to be) – I will keep this list updated with the cheapest amazon memory prices as I see them:
And for those interested in the products I used to help create this post:

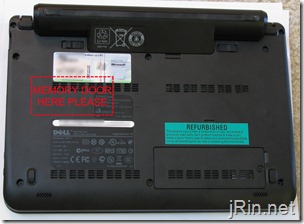
what is the memory you used to upgrade, and what is a good place to get it?
thanks
@James, I used this one Crucial 2GB 667 Mhz CT25664AC667 DDR2 200-Pin SODIMM Laptop Memory — however, any 2gb stick of DDR2 laptop memory should work. There is currently a deal on a single 2GB stick for $12 after $20 mail in rebate over at zipzoomfly (and yes, even though it says “for MAC”, it will work!).
Thanks a lot for this! It was a pain, but your instructions made it a lot easier!
I’m not sure I could have done this without your video. Awesome, thanks!
Thanks jrin – just did this in not much more time than it took to play the vids. The only scary part was the black tray between the palm reast and the mobo. Man that thing feels like it is gonna break on the left side!
Pumping 2 gigs in the mini!
thanks again
I really liked your video! When are you going to have another one on how to upgrade the memory of a Dell Mini 10? Can I use the same video for the instructions. Thanks!
@Mimi, unfortunately, the Dell Mini 10’s memory is soldered into the motherboard and is not upgradable – it is stuck at 1GB max (note, this is different than the dell mini 10v)
Some other upgraders have noted that the keyboard is easier to remove if you push up through on of the removed screw holes with a very thin screwdriver.
I will add anything new I discover as I go through this process (I am also adding bluetooth!)
@Mare, ah good idea, that would make it much easier to remove the keyboard!
why stop @ 2Gig and not go for the 4G chip
@Rod, the chipset on this netbook (as well any other current netbook) can only handle 2GB
I bought CORSAIR 2GB 200-Pin DDR2 SO-DIMM DDR2 667 (PC2 5300) Laptop Memory Model VS2GSDS667D2 at NewEgg (http://u.nu/3v923) for US$ 26 (free shipping). I hope it will work.
Wow thanks for the step by step, so much easier than the dell manual to follow a visual. Great job!
Why they did not just put an access door for RAM is just crazy.
Many Thanks
Thanks man. I did it! The step by step was great! I’ve taken apart many laptops and netbooks but your guide made things flow much more quicker since I was unfamiliar with the machine. Great job!
Vincent
Thanks so much for the step by step! I have done a number of memory upgrades on laptops but your video made this one a breeze.
Thanks, worked out perfectly! This made it much less intimidating :)
I got in on the “zipzoomfly “deal on a single 2GB stick for $12 after $20 mail in rebate, before I even got my Dell Mini 10v… like you I got a refurb for $279 with every option except Bluetooth… (16GB SSD)
Thanks James for the tutorial…
One problem I have is the mini-pci Dell 1510 a/b/g/n card it came with is really crappy running G…
Will the Intel wireless 2200BG mini-pci cards work in the 10v?
Also which bluetooth card works with the 10v?
Thank you so much, this video helped a lot. I was unsure if I could even do it, but your easy step by step video made it a breeze!!!
Wow… thanks. There’s no way I would have figured that out but it was ~easy with your instructions.
Thanks. This howto made things easier.
do not update on mini10 hdmi!!! because on this is the graphic and ram together build in the ram slot!!! or you have 2gb ram with graphic
selam
Thank you, a very well done manual
Greetings from Germany
Thomas
Thanks for that manual. Now my mini can handle bigger programms and is working still very good. Even the perfomance raised on the normal working level. Best regards (Germany)
This is going to sound really stupid but wouldn’t it be easier to locate exactly where the ram is and cut and inspection hole which you could fill in afterwards?
I really want to upgrade my Dell mini 10v from 1gb ram to 2gb ram but Im reading on alot of sites that 1gb ram is the max for these 10v minis. Can anyone confirm that they’ve put 2gb ram into these mini 10v’s and it recognizes the full 2gb??
Thanks
Chas
@Chas, the dell mini 10v can indeed be upgraded to 2gb, but it can only be ordered from Dell with 1gb (you have to manually upgrade it from a 1gb stick to a 2gb stick). Please keep in mind that the Dell Mini 10 (different than the Dell Mini 10v) cannot accept more than 1gb as the memory is integrated and not removable/upgradable.
Well, I did some research, and it appears that the solution for problems with the mini-pci-e Dell 1510 a/b/g/n wireless card is to run it on channel 11 (top of the spectrum) on a Wirelss G network… I changed from channel 9 to 11, and the difference was night and day… less than .5 mb/s to 13-plus mb/s…
in reference to the “Dell 1510 a/b/g/n wireless card” comment above, how could I make this change? We have a “G” router and the DL speed is pathetic. If this fix is true, would really help us alot!!
You have to sign into your router, and change your wireless router to broadcast on channel 11, and in the properties of the 1510 card, you need to turn off 11B and 11N, and choose channel 11(20MHz) under the various properties of the 1510 wireless card.
Thanks for the videos. I’ve done a lot of work on desktops/servers, but I’ve always been timid to crack open a laptop. Your video was outstanding! With only a few scratches around the trackpad cover (damn screwdrivers, no fingernails), my 2GB is installed. Thanks again!
Thanks dude! Your instructions are certainly easier to follow and understand than those in the Dell service manual.
Cheers!
Great video, saved me alot of hassle!
Great video – many thanks. It all looked a bit scary at first but there are no really difficult things to do, just a long list of fairly simple ones so it was easier than I thought. Next job – install Windows 7!
Bought a wonderful refurbished Dell Inspiron mini and a spare 2GB stick. Ripped the mini apart but found out as James Rintamaki that the 1GB memory is soldered into the motherboard and is not upgradable. Now I´m stuck with the 2gb stick and the 1gb dell mini.
@Retlaw – sounds like you bought the Dell Mini 10 (and not the 10v) – the Mini 10 is still nice though since it has HDMI!
Does anyone know if doing this will void my Dell warranty?
Nice video – waiting on mine being delivered. Once I have 2GB, it’ll be Hackintosh time I think – http://www.gizmodo.com.au/2009/10/how-to-hackintosh-a-dell-mini-10v-into-the-ultimate-os-x-netbook/
Wow, what great instructions. Took me about 90 minutes to add the module. Probably not for the faint of heart though.
Also a good time to put in a larger drive if you’re doing a multi-OS installation.
wicked…
just got mine this week with 2gb…
slight modification I couldnt get the screw for the wireless card off, so I carried on to see whether it was important or not and it makes getting the motherboard off slightly tricky but was still able to do it…
Took me about 30-35mins to do it, and definitely not for the faint hearted!
hackintosh time now… mwah
Yes this will void your warranty, unless you take it out before you send it back in, and put the original 1GB module back in… if you bought a refurb 10v like the rest of us, you should have no problems, because you can blame any scratches on the previous owner….
[quote]SCMD on:
28 October 2009 at 10:31 amDoes anyone know if doing this will void my Dell warranty?[/quote]
Thanks a bunch for the guide. I have HUGE hands and was crazy intimidated to take apart my hackintosh mini.
With the help of your guide I was able to do it in under an hour even though I went super slow to make sure I didn’t screw up. The only problem I had was with the wireless card. It was impossible to unscrew it without striping the screw. Yet with some slight maneuvering I was able to still pull out the whole motherboard with it still attached.
Awesome guide. Just upgraded my mini to 2GB and 500GB HD. Saved me hours trying to guess which screws to take out when.
Outstanding instructions. Took me 45 minutes and it works just great. I used PC2-6400 800 MHz memory; maybe not necessary but it was $33 on eBay.
THANK YOU SOOOOO MUCH!!!!
I was so frightened of taking apart my netbook…. I had already voided the warranty when I hackintoshed it… so if I messed anything up – it was pretty much going to be a door stop. Everything went really smoothly – the wireless card (which is one of the first steps – seems to be glued in – I had to have a guy at work loosen it for me… a friend of mine suggested to use a powered screwdriver as to not strip the screw – just an idea.
I should probably have said – that it is the SCREW holding in the wireless card that seems glued in – not the card itself… =)
Lisa, hackintoshing definitely should not void your warranty. You just installed software.
BTW can you please report how you feel OSX in the machine? I know it boots and all but, Is it REALLY stable? Can you really use it for serious things? thx
Does anyone know the best place to get a really good but cheap extra stick of RAM?
@Kyle, this one is $30 at amazon right now: Patriot PSD22G6672S Signature PC2-5300 DDR2 667MHz 2GB SODIMM CAS 5 Module (Green)
Thanks for the guide… It took about 40 minutes to complete. Just a couple things I learned that may help others.
1. Earlier in the comments some one mentioned this, if you push a screw driver thru the center keyboard screw hole it is very easy to release the keyboard.
2. I use a medium guitar pick instead of my nail to release the pull rest. Same technique as the video. In my case it seemed like it release a little easier.
Thanks Again!!!!