This post has been updated! Check out the new, easier, methods of adding your signatures to PDFs here
In an effort to go completely paperless, I was presented with the problem of needing to sign a document (pdf) that was emailed to me and then needing to send it back. Without having to print out the form to sign it nor needing access to a scanner or fax machine to send it back, you can simply take a picture of your signature, and then using free tools you can “import†it “into†the PDF and email it right back!
This may seem long and complicated at first, but once you read through it and do it once, it should be fast and easy a second time – And granted, there may be slightly easier ways to do this with paid tools, but this guide is for using freely available tools which you also may have one or two already installed!:
1. Download and install the tools
Here is what you need to download:
- Adobe Reader 9 which you probably already have. We will use this to view the original PDF and take a single screenshot to import into the image editing software (don’t worry, it will look good!),
- Paint.net (or really, any drawing program that can do layers and make transparent images) which we’ll use to overlay your signature on the PDF screenshot, and then also to re-print to a new PDF,
- CutePDF (or any other free PDF Printer), which as opposed to printing to a printer, will allow you to “print to†(create) a PDF, and
- A way to get a copy of your signature on your computer. I used my iPhone to take a picture of my signature, though, you can use what ever camera phone, real digital camera, etc that you have.
2. Convert your PDF to a screenshot (an image)
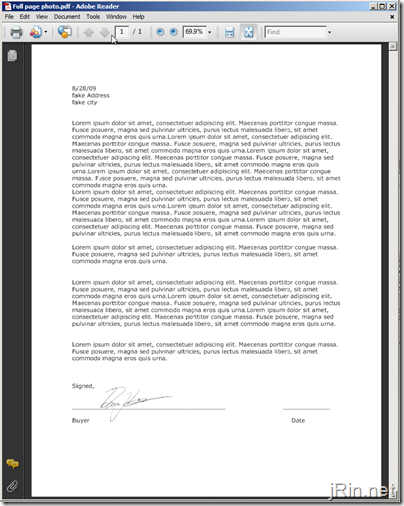
Open your PDF in Adobe Reader 9 and zoom all the way out so you can see the entire page (even if it looks small and you can no longer read anything):
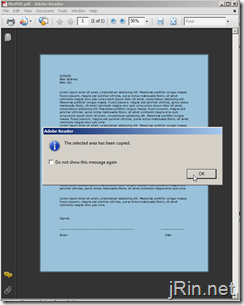
Next, select the SnapShot tool (“Tools†–> “Select & Zoom†–> “Snapshot Toolâ€) and starting at one corner, click-and-drag to the opposite diagonal corner to highlight the entire page. Once you do that, you should receive a dialog box saying that the selected area has been copied to the clipboard:
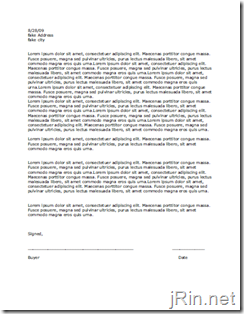
However, if you proceed in using what is currently copied, it will be exactly the same size as you are currently looking at it; meaning, it will be really small and will end up very pixilated when you “blow it up†to normal paper size when you re-print it as a PDF, such as the image below (click to enlarge to full size):
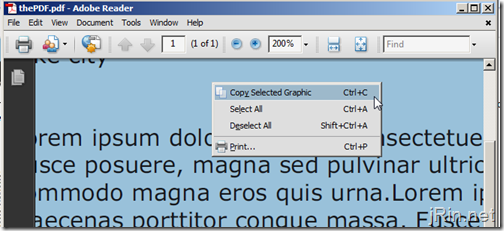
So, in order to fix this, make sure the page is still highlighted (transparent blue) and then zoom in quite a bit (“View†–> “Zoom†–> “Zoom To…â€). You don’t need to zoom to 5000%, but 200-300% should be enough. While making sure it is still highlighted, right click anywhere it is blue-ish, and click “copy selected graphicâ€. You now have a much larger screenshot of the PDF in your clipboard.
Proceed by opening Paint.net and pasting into a new image (Edit –> Paste) and feel free to save this as a PNG file if you want (I’ll refer to this image as “pdf screenshotâ€). Either way, to make things easier, go ahead and keep Paint.net open while we move forward. You now have a large, high quality screenshot (image) of your PDF which is ready to have your signature placed on top of!
3. Get your signature onto your computer
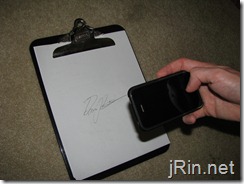
Okay, so now you need to get your signature on the computer. Chances are you have a decent enough camera phone (and a way to get those pictures onto your computer) that you can use to take a picture of your signature , such as the iPhone – or – you can of course use a scanner, a real digital camera, or however else you can come up with a way to do it. With my iPhone, I just took a picture of the signature in a decently lit room and then emailed my self the picture:
(and no, this is not my real signature, ha)
4. Prep your signature for overlaying on the PDF screenshot
We will now make the image black and white, enhance it (using brightness and contrast), and then make everything that is not the signature (the paper) to be transparent. Open your signature in Paint.net (or whatever image software you are using) and 1) convert the image to black and white, and then 2) adjust the brightness and contrast so that it really is only black-and-white.
To do this, start out by opening the signature image in Paint.net (“File –> “Open†–> find your image). If you already have your pdf screenshot open, you should now be in a new Paint.net window:

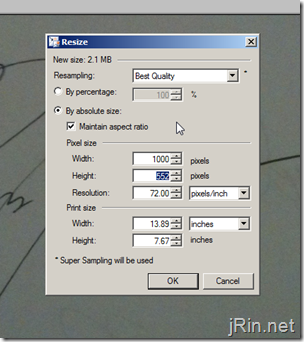
First, we’ll go ahead and resize the signature just incase it is huge by going to “Image†–> “Resizeâ€. Make sure “Maintain aspect ratio†is checked and change the width to 1000 pixels (leave whatever number appears in the Height section as-is. It will probably not be the same as mine). Click ok. (resizing now will help prevent issues when pasting it over the pdf screenshot later)
Now, 1) go to the “Adjustments†menu bar, then click “Black and Whiteâ€, and then 2) go back to “Adjustments†and then “Brightness / Contrast†— for my particular image, I had to set brightness at 52 and contrast at 79 for it to look like the following (your settings will vary) – the goal here is to have the background as white as possible while having the signature stand out and be clear:
Now we need to make all the “white†become transparent so we can overlay it on top of the pdf screenshot.
First, select the Magic Wand tool and start with a tolerance level of 50%:
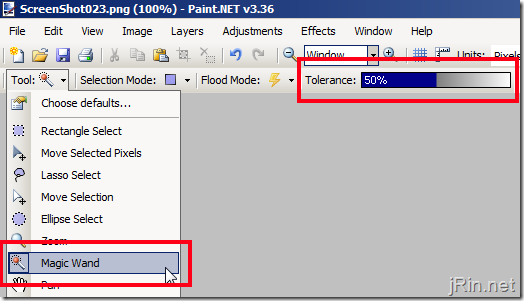
Then, hold the CTRL key while you start clicking on the white areas of the image. Keep clicking the white areas (while still holding CTRL) until they have all been selected so you get something that looks like this (zoom in if you need to in order to get enclosed small areas such as the white space in letters like P, B, O, etc):
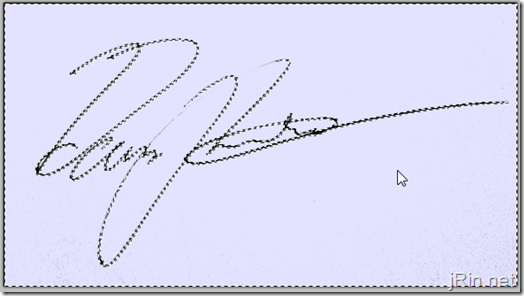
At this point, you can then press the delete key, and everything that is highlighted (all the white) will be removed and will be replaced with transparency (white and grey checkered boxes):

There, now your signature is ready to be placed on the pdf screenshot!
5. Paste the signature onto the pdf screenshot
Start out by copying your entire signature by going to “Edit†–> “Select all†and then copy it (edit->copy). Then, move on over to your pdf screenshot (just click on it’s thumbnail in the top-right corner if you still have it open, or if not, open it! [with Paint.net] ).
From here, create a new layer on top of your pdf screenshot by going to “Layers†–> “Add new layerâ€: (this will allow you to place the signature “on top†of the pdf screenshot without covering anything up)

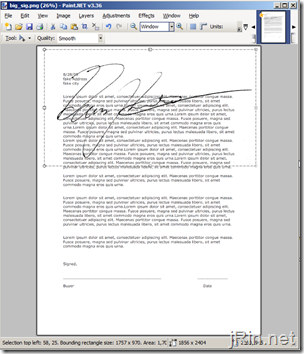
Next, paste the signature into this new layer (“Edit†–> “Paste). Chances are, your signature will be a big large, but either way you will need to resize it to the size your actual signature would be and move it down to the signature line:
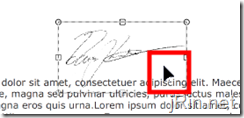
With the signature still selected (dotted lines still surrounding it), hold the SHIFT key on the keyboard while you click and drag one of the corners of the signature selection (when you move the mouse cursor to one of the corners, the cursor should change from a solid black arrow to a white hand, thus signifying you can resize). Hold the SHIFT key while you resize it so it will keep the same aspect ratio. Continue to resize it until it is about the right size that you signature would be. Once you are happy with the size, let go of the SHIFT key and release the mouse button – now, move the cursor to the middle of the signature so you now have a black arrow cursor – this will now allow you to move the signature down to the signature line:
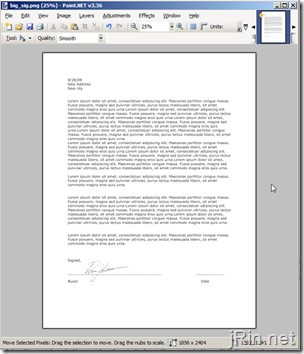
Now, click and drag the signature to the signature line and release the mouse button. With the signature where you want it on the pdf screenshot, proceed to “flatten†the image (combine the “signature layer†with the “pdf screenshot†layer) by going to “Image†–> “Flattenâ€. Congratulations, your PDF screenshot is now signed and ready to be re-saved (“printedâ€) as a pdf!
6. Print to PDF
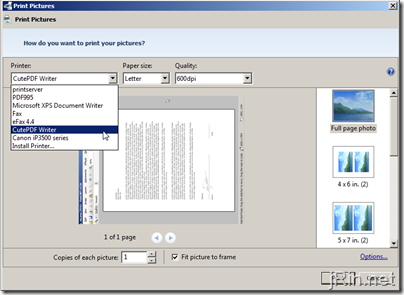
Now, go to “File†–> “Printâ€, and select your PDF printer (in my case, “CutePDF Writerâ€). Be sure that you select Full Page Photo and don’t choose the option for cropping if you see it (I am using Windows 7, but if you were using XP you may see the option for full page photo cropped) and continue to print.
Your PDF printer software will now most likely have some sort of dialog box asking you what to name, and where to save, your new pdf – go ahead with that, and then enjoy your signed pdf!
So there you have it, you were able to bypass having to print it and scan it in (or fax it)! Have a simpler (free) way to add a signature to a PDF? Did I miss a step you can’t seem to get passed? Let me know in the comments! (caveat emptor, this guide is in no way meant to act as a way to forge, or otherwise impersonate, someone’s signature!)



Good Article, but for editing PDF, i prefer PDF editor more, it is quit easy to edit contents, security for PDF.
hi there,
thanks for the great article. it helped me a lot. i wish you would have mentioned at the end that you can safe the project, in case you wanna sign more documents later, and don’t want to keep paint.net open the whole time. other than that, GREAT HELP!!!
There is http://www.mylivesignature.com/ – it does not reflect ‘your’ signature but comes up with some interesting fonts that you can save
Dear James,
Thank you so much ,
Your explanation was so good and halpeful
I hope i will get the oppurtunity to help others like you helped
Me , i can promise you you did, more than you can imagine
Thank you very much
With best regards
Someone you helped him
too bad we can’t download it cause our free disk space is low… but i think i know it works because the proof are the comments.. good work!
Pingback: How can you add your signature to a PDF for free? | Consulting Rehab
You can do the something without going through the hassle of editing it through paint by using Nitro PDF Reader. Has basically all the functions of Adobe Acrobat for free. Simply paste your jpeg signature to the document. Save. Done.
you can not do this with nitro free or paid it can not handle transparent images
Thank you. Been Around. The Nitro PDF Reader work very good, easy to copy from JPG and paste the signature.
Regards
@Been Around, but unfortunately Nitro is not free (well, it has a 14 day free trial) — can it handle transparent png’s?
@James Rintamaki
Nitro PDF Reader is indeed free (no trials involved). You need to download it from http://www.download.cnet.com as opposed from the Nitro website. For what its worth, its a beta version but works fine for me, 32 bit and 64 bit versions.
Can handle .pdf, .bmp, .gif, .jpg, .jpeg, .tif, and .png files for sigs. I believe there is no need to create a transparent image as the software should do it for you. I just cropped a signature from another document and pasted it into Nitro and it works just fine.
Sorry, broken links.
fixed:
(32 bit) http://download.cnet.com/Nitro-PDF-Reader-32-bit/3000-10743_4-75205901.html
(64bit) http://download.cnet.com/Nitro-PDF-Reader-64-bit/3000-10743_4-75206289.html
Was able to do this on mac with photostudio. My one issue is that my signature page is on page 16 of the document. How do you work in the first 15 pages?
Thanks
@Been Around,
Ah, that’s actually an even better/easier way to do this all — less tools to have to mess with, plus you can save (and password protect) you signature as a stamp within the program!
@Len,
Using my method, you could “print” the first 15 pages to a PDF, then “print” the last page with your signature on it also to a PDF, and just “append” that last page to the first PDF you created of the first 15 pages (by choosing to save the signed page as a pdf with same name as the 15 page pdf and selecting append as opposed to overwrite). OR, you could import your signature into Nitro PDF (linked by Been Around) above and just apply it to page 16 of the pdf and re-save it!
Thanks, very useful
Will try. Does Nitro PDF work with MAC?
Ah, no, just Windows XP/Vista/7
James, this is one of the most helpful tutorials I have ever used. It saved me several bucks on faxing. Thank you!
This Is To Complicated Like You Said .
Here Is My Way :)
Get Foxit PDF Editor
Open The File In Foxit PDF Editor The One You Want To Add The Image ( signature )
At The Top of The Foxit PDF Editor Click Add Image From File( If You Need A signature Just Go To http://www.mylivesignature.com/ And Make One ..:) Save The Image ( signature ) And Use That.
That’s It.
Оktareal-css.do.am лучший потрал о легендарной Ñерии Counter strike.
Many thanks James, your explanations are very clear and most helpful. I was on the other side of the planet with my job contract sent to me to sign. Having no scanner, I nevertheless managed to send it back. Great help !
Marie
Thanks for the great article.
Once you create your signature image (PAINT.net rocks!) there is much easier (and free) way to apply it to the original PDF! (without having to bother with the screen-capturing or printing to image)
Just get PDF-XChange Viewer (search for it), and then you can CTRL-V paste text or image directly into the document (unless it is encrypted/protected). You can also create a custom palette for the Stamp Tool with your signature image. Pretty awesome tool!
Thanks!
this was a big help and worked beautifully! thanks so very much!
Pingback: Add your signature to PDF disclosures free « iOriginate Loans
Just wanted to thank you guys too, that nitro pdf really makes it easy. I’ve got a paperless office too, and it annoyed me to have to print a page, sign it, then scan it back in and shred the page I just printed. Thanks a ton to all of you!
Pingback: Add your signature to PDF disclosures free | i-Originate Loans
This is pretty cool. There are couple of steps involved but important thing is that it is free. It will really helps me in the future. Nice hack.
Thanks.
I wrote in last August that you have saved me several bucks on faxing. Every time I have to do a W9 for a new client (like now,) your procedure saves me a few more bucks on faxing!
Thanks JAMES RINTAMAKI for providing steps to to add your signature to PDFs for free.thanks for sharing with us.
If you are on a Mac running OS X Lion – Preview can do all of that for you – including taking a picture of your signature with the computer’s camera.
This was extremely helpful that you for you explicit instructions.
Boss ! if you want to sign pdf using digital certificate then you need to use digisign type software.
This will work but the resulting print-out won’t be in the same quality as when you print it and sign it yourself because of the disparity between screen resolution (normally 75 DPI) and printer resolution (300 / 600 DPI). I’ve written about how to get around such problem with Word: http://blog.gigantt.com/2012/01/handwritten-signature-in-ms-word.html
I can’t even tell you how much I appreciate this. I’ve owed W9s for so long, but the whole print, fax, email process is such a pain, it prevents me from sending paperwork. Incredibly helpful.
If you get the new Nitro PDF Reader 7, you no longer have to do any of this. Make it your default PDF reader if you want and when you get a PDF by email or any other way just click on it and it should open to using Nitro PDF Reader 7. Then, you just set up the new “QuickSign” feature with your scanned signature that you modify in MS Paint, included in Windows 7 already. You save the new Paint file to your Desktop or wherever you want and run the “Create new Signature” feature in QuickSign. That’s it!!! From then on you just click the button and your signature appears on the document. Click on it to resize and then double-click to make permanent. I’m so impressed that I’m going to thank them by buying the Pro Version down the line.
To complicated…Just open the PDF… go to edit “take a snapshot”… open paint.. paste into paint…insert a text box,,, hand draw your signature with the mouse or type with font(depending on requirements) Save to desktop..copy…open word and then paste.. then “save-as” a PDF document and your done !
Worked great.
One tip: If your signature is not horizontal, or otherwise needs to be twisted while positioning it, hold RIGHT CLICK and you can rotate it. Left click is to move it around.
One more note: To those of you that think it is too complicated, note that it is VERY SIMPLE, the author just went out of his way to show every step. What seems like a long set of instructions only took me less than 5 minutes.
Thanks again!
Just tried creating a sig with Nitro Reader.
It’s so much easier than the method James described here.
When James published his method, it may have been a very viable option.
But now we have other options, and Nitro’s “QuickSign” is very painless.
All you need is a good quality scan of your sig (300dpi would be good) on a white background in an acceptalbe format(pdf, bmp, tif, jpg).
The background does not need to be tranparent, Nitro takes care of that for you.
Thanks for the heads up on Nitro Reader, I was just stating to look into this subject. You saved me a lot of time.
Great idea for a blog post. Great recommendation on NITRO PDF! Gratitude!
I simply took a picture of my signature on a white sheet of paper whith my iPhone and uploaded it onto my laptop. In Acrobat X, I went to “Sign” and uploaded my picture. Acrobat X automatically adds transparency and layers the image on the document! You can place the sig and resize it wherever and however you want, click “done signing” and that’s it! Much more simple.
I believe the author was trying to get a “FREE” method of adding a signature. Acrobat X costs $200…
Pingback: How to easily sign PDFs for free | jRin.net
Hi all, just wanted to let everyone know that thanks to your comments and a few software updates, I’ve written a new post that updates on this one: http://www.jrin.net/2012_05_16/how-to-easily-sign-pdfs-for-free
Tnx a LOT
THIS WAS A LIFESAVER – I HAD TO PREPARE A PDF DOC WITH SIGNATURE FOR WORK AND THIS IS JUST WHAT I NEEDED – MY BOSS WAS SURPRISED I GOT IT SO WELL DONE – I USE FOXIT – WORKS LIKE ACROBAT READER 9 – BUT BETTER. THANK YOU FOR THIS VERY CLEAR AND SUCCESSFUL TUTORIAL.
Thanks for posting – works great!
What a crock…
This is not a tutorial on how to digitally sign a PDF. This is simply adding a graphic over a PDF, whether this is legally binding is debatable, and at the very least it opens yourself up to forgery.
PDFs have a built in feature allowing you to digitally sign, and the graphic is simply a visual representation of that signing. It is an established standard where the ‘signature’ is encrypted and embedded into the file.
Actual digital signing is much more secure than this hack method. Do your research before you make a tutorial showing people how to do things, especially things that have very significant legal implications.
Oh, Great All-Knowing Omnipotent James! So nice of you to privilege us with your COMPLETELY UNHELPFUL and useless comment. Astute observation there, “This is not a tutorial on how to digitally sign a PDF.” That must be why nobody ever said it was! Brilliant powers of observation you have there!
If you are so incredibly above and superior to this “crock” “hack” method, why don’t you stop thread-crapping and actually offer something helpful, like specific information on how to digitally sign a PDF, what software is best to use, and so on…
Otherwise, take your critical useless comments elsewhere. As evidenced by the many other positive and useful comments here, this has been a helpful article for many people.
Je ѵoÕ½drai vous dire que c’est incroyablement
un plaisir de visiter votre site internet
Thank you. This was really detailed and clear. I had to use one more tool “Merge PDF” because I had to sign on multiple pages (like, on 2nd,3rd and 8th page) and merge them into one PDF file.
I think the result was actually better than if I would have printed it out and scanned it!
I followed the instructions only to the point of importing the pdf screenshot into paint. Instead of importing a picture of my signature, I just signed it using paint brush tool. It works, just use the thin line black ink selection and just sign it!
Pingback: Signature for PDF and Word documents | Binglong's space
The Nitro really saved a ton of time. Thanks for sharing the info. I would be willing to purchase that due to the simplicity.